
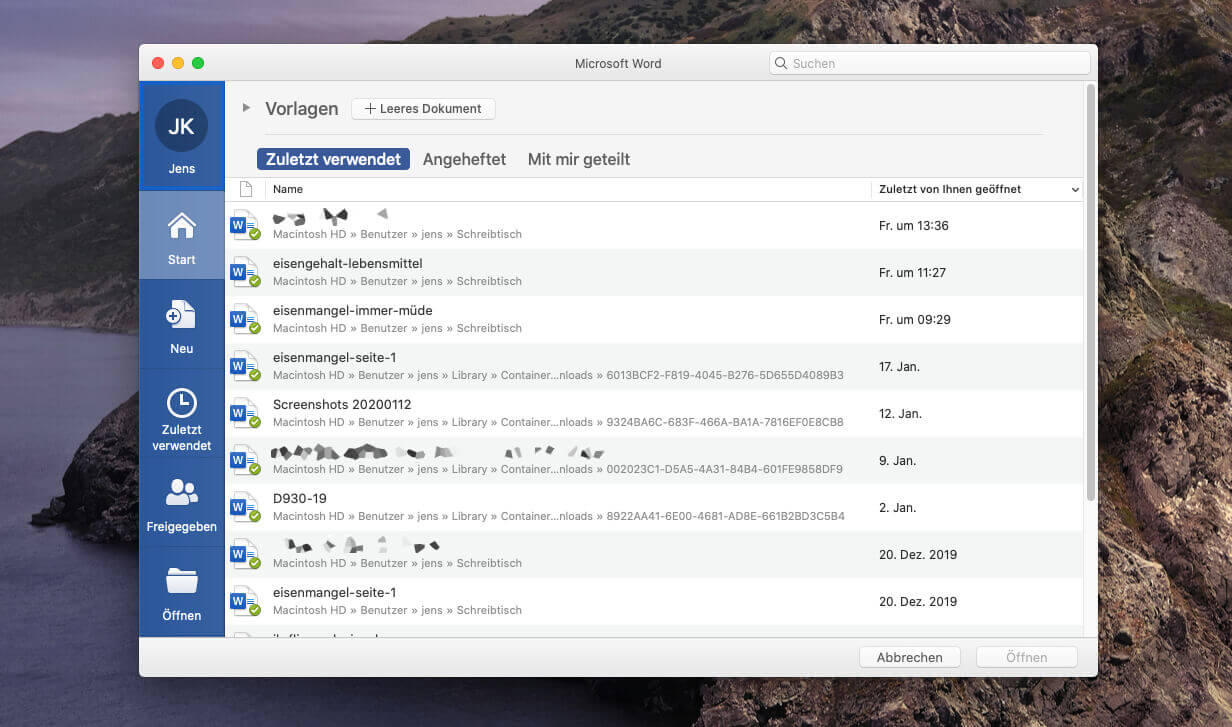
A reader recently asked me if I had a tip on how to completely delete the list of recently used documents in the Microsoft Office version of Excel and Word for the Mac. At first I thought that would be a relatively simple question, because you usually delete these lists with the most recently used documents on the Mac in this way:
- Click on the apple symbol at the top left
- Select “Used Objects”.
- Select “Delete Entries” at the bottom of the list
So I sent him this quick guide and thought the problem was solved. But of course I did the calculation without Microsoft, because all Microsoft Office for Mac programs manage these lists independently and accordingly the procedure above does nothing at all.
Chapter in this post:
- 1 Differences between Mac and Windows Office
- 2 Update December 10.12.2023, XNUMX: Only works to a limited extent
- 3 Update 30.11.2020/XNUMX/XNUMX: Empty files and activate write protection
- 4 How to use Excel
- 5 How to use PowerPoint
- 6 Word procedure
- 7 [Old tip] Delete the list by removing the corresponding file
- 8 Instructions for Word
- 9 Instructions for Excel
- 10 Tip: Create an alias for the folder
- 11 Similar posts
Differences between Mac and Windows Office
If you research specifically for tips on how to remove this list of recently used files, you will come across two types of instructions:
- Right-click the entry and then select “Use from allowed”. remove.” – i.e. remove it from the list recently used. That cuts, but you have to do the procedure with each individual entry, which may take some time.
- There are some forum posts that actually provide helpful and working instructions - when using Office for Windows.
The ability to remove the entire list was simply not implemented by Microsoft for Office for Mac. So there is no “convenient” way to clear this list with one click.
Update December 10.12.2023, XNUMX: Only works to a limited extent
My loyal reader Richard sent me an update on his latest adaptation. Thanks to you Richard! Here is his note:
Since MS Office 2021 it only works to a limited extent, you also have to uncheck Settings - General / Show document catalog when opening Word, then only a dead entry remains, see below - the same applies to Excel
Dead entry Word
/Users/USERNAME/Library/Containers/com.microsoft.Word/Data/file:/Users/USERNAME/Document/Example.docx
In Excel you also have to uncheck the box under Settings - General / Show workbook catalog when opening Excel.
Dead entry Excel
/Users/USERNAME/Library/Containers/com.microsoft.Excel/Data/file:/Users/USERNAME/Documents/Example-Folder.xlsx
Update 30.11.2020/XNUMX/XNUMX: Empty files and turn on write protection
My reader Richard, who gave the first good tip about how to delete the list of recently used documents, has another tip on how to keep the list permanently empty without deleting the file again and again.
The trick is: You find the relevant file, empty its contents with a text editor and then activate the write protection of the operating system so that Word or Excel cannot change this file again. Close all Office applications beforehand!
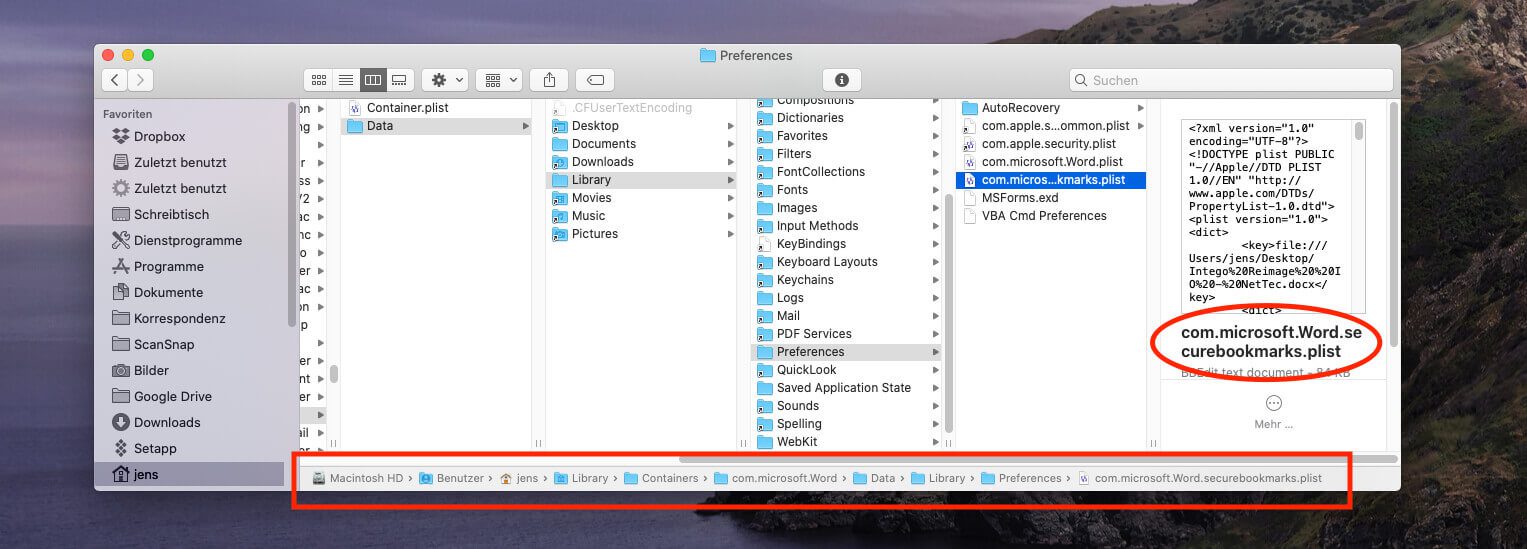
Important: If "USERNAME" appears in the paths below, you must replace this name with your username, otherwise you will not find the corresponding folders.
Procedure with Excel
In the folder: /Users/USERNAME/Library/Containers/com.microsoft.Excel/Data/Library/Preferences
the file: com.microsoft.Excel.securebookmarks.plist
Empty with the text editor (i.e. 0 bytes) and then protect.
Protecting works by highlighting the file and then pressing CMD + I. Then an information window opens for the file in which you set the checkmark under “General” > “Locked”.
Procedure with PowerPoint
In the folder: /Users/USERNAME/Library/Containers/com.microsoft.Powerpoint/Data/Library/Preferences
the file: com.microsoft.Powerpoint.securebookmarks.plist
Empty with the text editor (i.e. 0 bytes) and then protect (refer to Excel for instructions).
Procedure with Word
In the folder: /Users/USERNAME/Library/Containers/com.microsoft.Word/Data/Library/Preferences
the file: com.microsoft.Word.securebookmarks.plist
Empty it with the text editor (i.e. 0 bytes) and then protect it (refer to Excel for instructions).
[Old tip] Delete the list by removing the corresponding file
My reader Richard then - after I had long since given up - found a way how to delete the list with a reasonably manageable effort.
To do this, go to the library folder (here a Instructions on how to open the library folder) and then follow the instructions below.
Instructions for Word
You go to this folder:
/Library/Containers/com.microsoft.Word/Data/Library/Preferences/
Inside is a file called “com.microsoft.Word.securebookmarks.plist”. You should rename or delete them and then restart Microsoft Word.
Instructions for Excel
You go to this folder:
/Library/Containers/com.microsoft.Excel/Data/Library/Preferences/
Inside is a file called “com.microsoft.Excel.securebookmarks.plist”. You should rename or delete them and then restart Microsoft Excel.
The instructions seem to work with all Office for Mac versions. My reader has Office Mac 2019 and I have Office Suite 365 and it works for both of us.
Tip: Create an alias for the folder
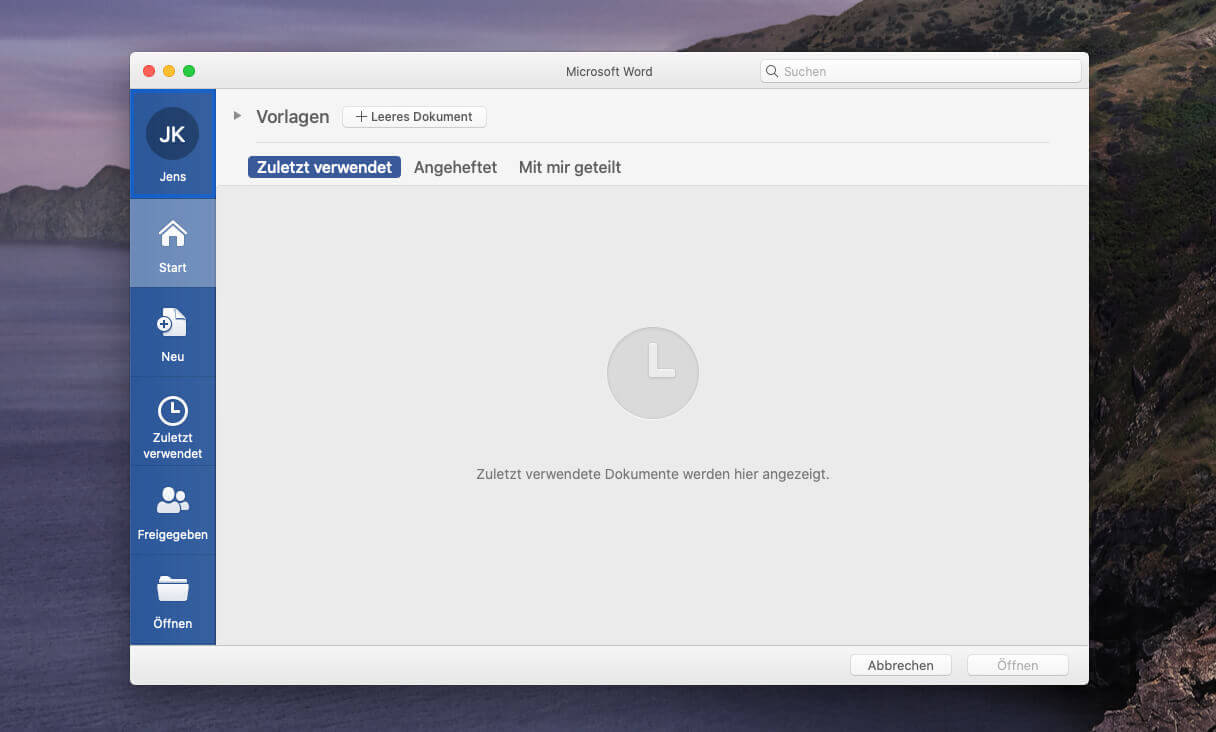
After the action, the "recent" view in Excel or Word should be empty. If you have to do this thing more often, I would add an alias to the folder on the desktop.
To do this, open the path mentioned above until you are in the /Library/Containers/com.microsoft.Word/Data/Library/ folder.
Now right-click on the “Preferences” folder and select “Create alias” in the context menu. This creates a new alias folder that you can then drag to the desktop, for example. Double-clicking on this will take you directly to the subfolder in the future, where you will find the “securebookmarks.plist” that needs to be deleted.
Related Articles
 Internet Archive – possible uses of the worldwide archive
- YouTube Achievements cards and creator awards - a good motivation for creators
- Apple System Status: Find iCloud outages and issues with other Apple services here
- Mac: Find the AT sign (Klammeraffe) on the keyboard of Apple computers
- What is the difference between a plugin and an add-on?
- What is “dogfooding” in the area of hardware and software development?
- Mobile online casino apps for the iPhone at a glance (sponsor)
- What exactly is Markdown?


Jens has been running the blog since 2012. He acts as Sir Apfelot for his readers and helps them with technical problems. In his spare time he rides electric unicycles, takes photos (preferably with the iPhone, of course), climbs around in the Hessian mountains or hikes with the family. His articles deal with Apple products, news from the world of drones or solutions to current bugs.
Great post!
For powerpoint
com.microsoft.powerpoint.securebookmarks.plist
Thank you for mentioning my name in this post.
VG
Richard
Hi Jens,
I have the opposite problem. Microsoft doesn't remember anything with me, neither with Excel (16.16.19) nor with Word.
The favorites lists are always empty.
I signed out and signed in to the Microsoft account.
I moved the preferences to the trash.
For Excel I made a list with all the tables.
And in between, of course, the computer was shut down and back up again.
Have you already had something similar?
Hello wolf! Unfortunately no, but maybe the very files that I write above that you have to delete are defective. Try to delete it too. Maybe he will then create new ones ?!
I've already tried it. Just says the files are damaged. Deleted, and still the same problem.
Thanks anyway for the hint.
Hello wolf!
Maybe the files mentioned above are read-only for you.
As Jens had already written delete the files.
My idea is to restart the Mac after deleting it and have a look (don't start Word) whether the files are gone.
Hello, Jens
Thank you very much for the instructions, it worked fine for me. I was wondering how to permanently disable the display of recently used files. Because I actually don't want to have them. Do you know a solution for that?
Thanks and regards
Tony
Hello Toni! Unfortunately not. According to my research, there is no way to do this on the Mac. :(
When starting Word 2019, you can also deactivate the display of recently used files by unchecking Settings - General - Show document catalog when opening Word.
Open last used can be found under file!
Hello Richard! Does this work for you on a Mac or on Windows? I already knew that it would work with Windows, but I still haven't found a way for the Mac ...
AND!
On my iMac (Retina 5K, 27-inch, 2017) with Office 2019, for me it's flabby.
Ah, ok, then that's the solution for us Mac users. Thank you! : D
Hi Jens,
I assume that you have tested it.
Unfortunately, I only have Office 365. But maybe another reader has Office 2019 and can test it out?
I think it will work with Office 365 as well.
With Office 2019 on the MacBook Air, none of the above tips work for me.
The files that were opened earlier are still located under "Recently used". With Excel and PowerPoint, manual removal helps, with Word they sometimes reappear immediately
A super helpful guide - thank you! My files are all on some network files and web drives and Word starts again in 2 seconds - great!
Hello Rolf! Oh, the use case hasn't even occurred to me. I am very pleased that Word is now starting quickly again. : D
There are still happy Mac users thanks to my solution.
So all the effort was worth it.
Paths are not there, the files mentioned do not exist anywhere else, ...
What a shame about our time!
Hello Erik! I assume you didn't swap "name" for your username in the paths because I just tried that a few days ago and found the files through those paths. If not: Can you perhaps tell which path you are attached to?
I also had the problem: the specified path did not lead to the file and the file could not be found via the search. Only when I displayed the hidden files (thanks for the tip above!) Did the search work.
My path was as follows: / Users / USERNAME / Library / Containers / Microsoft Excel / Data / Library / Preferences
Deleting the com.microsoft.Excel.securebookmarks.plist file then achieved the desired result.
Hello Petra! For me, the invisible files are permanently set to “visible”… so I never think about this step. :D But thanks for your hint!
Thank you for the instructions. now word and excel starts again in 2 seconds, which is just a lot of fun.
Hello Hugo! It's practical that this also helps with the start-up speed of the apps. : D
Hello Jens, may I share this page with my tip in the Apple Community and ect. share ?
This tip is probably not widespread!
Greetings Richard
Hello Richard! Of course. 😊 Thank you! LG, Jens
Super
Hello, I have a question: I practically use Windows 365 on a Windows PC and an iMac. On the first device, I use Word and Excel a lot for work reasons, and I've noticed that all the files I open on the first device are up-to-date on the other device.
Hello Gius! I'm not very familiar with this, but I think it sounds like a Microsoft cloud solution that syncs the files between the two computers. But that's just an idea. I can't say if that's it. I don't have a PC and rarely use Office.
Hello, it's fantastic, I've been looking for a solution for a long time to clear this damn “recent files” list and finally you give me the solution, it works perfectly: well done and thank you very much!
Pat.
Hey, I still have bad news: it no longer works with MS Office 2021. If time permits, I'll get back to it again.
OK, too bad. But thank you for letting me know and wanting to take care of it again!