The iPhone security check (original Safety Check called) is a function from iOS 16 that makes it possible to quickly and easily identify the people, apps and devices with whom you share information. You can also be deprived of access to information such as location, shared content and the like via the appropriate menu. I have summarized below how you use the security check on the iPhone.
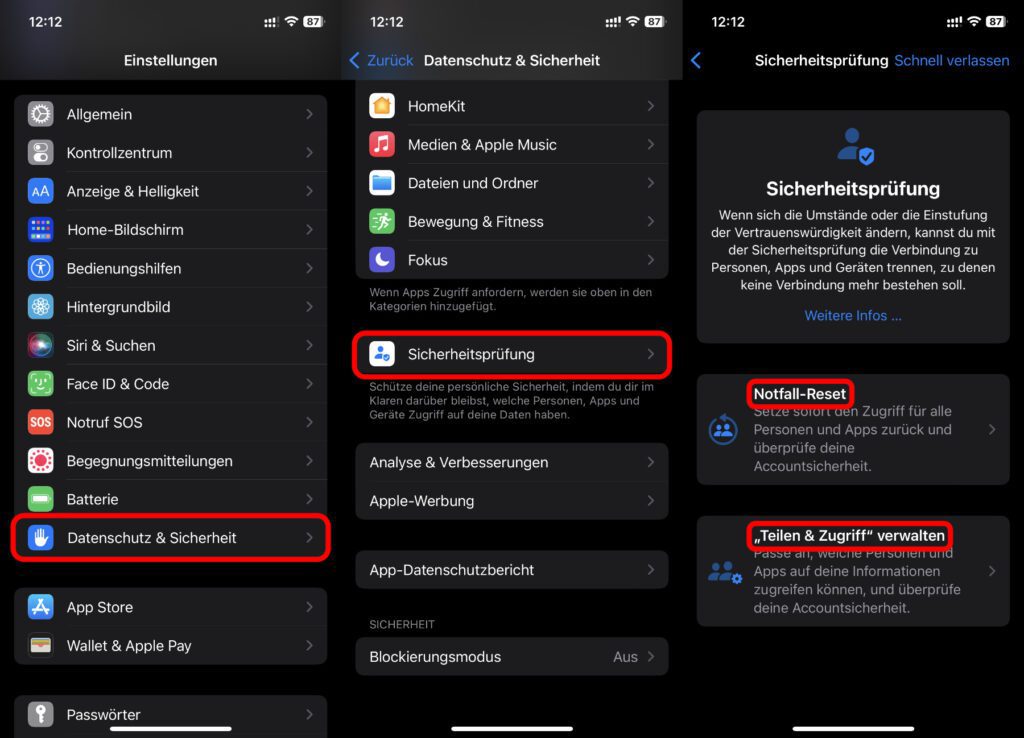
When it has to be done quickly: Settings -> Privacy -> safety test. "Quick exit" at the top right takes you back to the home screen immediately.

Chapter in this post:
- 1 This is how you find the security check on the iPhone
- 2 When things have to be done quickly: use the emergency reset
- 3 Quick exit to hide making changes
- 4 The individual steps of the safety check on the iPhone
- 5 Stalkers: Cut ads and digital connections
- 6 Apple's tutorial video for security check from iOS 16
- 7 Similar posts
This is how you find the security check on the iPhone
The Safety Check is made for everyone who wants to see which contacts, which software and which other devices (iPad, Mac, etc.) have access to data and information. Do you find yourself in a difficult social situation or does it even become dangerous because a person tells you about the "Where is?“ location or otherwise, then you can quickly take action here:
- Opens the Settings (gear icon) on your Apple iPhone
- Scroll down and select Privacy (white hand on a blue background).
- Scroll down there as well and tap on safety test (person with tick sign)

If it has to be quick: use the emergency reset
If you want to stop accessing Find My location sharing, shared calendars, shared photos, shared notes, health data, and the Home app directly, then the emergency reset be used. This can be found directly on the first page of the security check. Under the menu item is: "Instantly reset access for everyone and apps, and review your account security."
Important to know: This option resets all access for all contacts. In addition, all access rights of apps are reset (eg for Bluetooth, calendar, files and folders, photos, microphone and camera, etc.). For the use of pictures, headphones, Face ID, etc., the rights must therefore be reassigned after an emergency reset.
When using the reset for emergencies, settings related to the Apple ID are also checked, so that e.g. B. the password can be changed. So if an Apple ID or access to it is shared with someone who is causing you problems, this function can be very helpful. Because changing the login data will take away your access.
Quickly exit to hide making changes
In some situations it can be helpful to make the changes in a safe place first. If this is not possible or if the route to the location cannot be shared with a specific person, it may be necessary to act in their presence. In order to be able to immediately hide the change of the sharing settings via the security check, there is the Leave quickly Button.
This is located at the top right and ensures that the settings are closed immediately and the home screen is displayed. If you then call up the settings again, it is not clear which submenu you were in. "Quick exit" is displayed not only at the start of the safety check, but also in the individual steps. Changes made up to the point of activation are saved.
The individual steps of the safety check on the iPhone
If you don't want to use an emergency reset to remove all shared information, access rights for apps and Apple ID links with other devices, then you can also proceed in a more differentiated manner. The security check offers the button for this Manage Sharing & Access on. The procedure is divided into several steps and ideally starts with the contacts and the information and data shared with them. Important: All changes made are saved immediately. For some, however, confirmation is required after selection (see video below).
- Step 1 - Shared with people: Here you can revoke access to your location, home, health, shared notes, shared calendar and shared photos for individual or multiple contacts at the same time. Beforehand, it can be checked without obligation which information is actually shared with whom. There are sortings by person and by type of information.
- Step 2 - App Access: Again, you can sort by the name of the app or by the type of information shared. You can either immediately withdraw access to everything for individual apps or only select individual points. Displayed are: Bluetooth, Calendar, Camera, Contacts, Files and Folders, Health, Local Area Networks, Location Services, Media and Apple Music, Microphone, Exercise and Fitness, Photos, Reminders, Research and Speech Recognition.
- Step 3 - Devices: Devices linked via Apple ID can be removed from this type of connection here. This must be confirmed to avoid an oversight. In the next sub-step, the Apple ID password can be updated.
Stalkers: Cut ads and digital connections
If you have a stalker or are trying to work your way out of a toxic relationship or family, you don't have to do it alone. In unfair and, above all, dangerous situations, don't be afraid to file a complaint or at least ask for support from help centers.
Also, keep in mind that if you want to build a digital frontier, it's not just the Apple options that can be used. Social media (Facebook, Instagram, Twitter, TikTok, etc.) should also be considered in this regard. We have even more information for you here – also on stalking tools in software and hardware form: What is stalker ware? Information on software, AirTags and figures on cyber violence.
Help line violence against women: 0800 011 6016
Apple's tutorial video for security check from iOS 16
In addition to the official instructions in the support documents There is also a tutorial video on YouTube on the Apple website. You will find this with this link or directly embedded in the following:
Related Articles
After graduating from high school, Johannes completed an apprenticeship as a business assistant specializing in foreign languages. But then he decided to research and write, which resulted in his independence. For several years he has been working for Sir Apfelot, among others. His articles include product introductions, news, manuals, video games, consoles, and more. He follows Apple keynotes live via stream.


![[Update] Overview: Battery capacity (mAh & Wh) of the Apple iPad models](https://a391e752.rocketcdn.me/wp-content/uploads/2024/04/ipad-battery-capacity-mah-wh-150x150.jpg)