I have already explained how AirPrint actually works in a longer post. Basically, it's a special software interface that makes it possible to print from an iPad or iPhone without the need for printer drivers. However, the prerequisite for this is that you have an AirPrint printer and this must also be in the same WLAN as the device from which you want to print.

Chapter in this post:
First step: connect printer to WiFi
The first requirement for setting up a AirPrint-Printer is connecting the printer to the local network. Some printers have a WPS button for this. You press this on the printer and within about a minute on the router (on the Fritz!Box you will also find the WPS button). This means that the automatic setup can already be completed.
If the printer does not have a WPS button, you have to look out for terms such as “network”, “WLAN” or “connections” in its operating functions. Unfortunately, there are no general instructions here, as each printer is different. In any case, the aim is for the printer to be connected to the WLAN to which the iPhone, iPad or Mac is also connected.
If the printer is in the Wifi network, the next steps now come on the Apple device.
Set up AirPrint printer on Mac
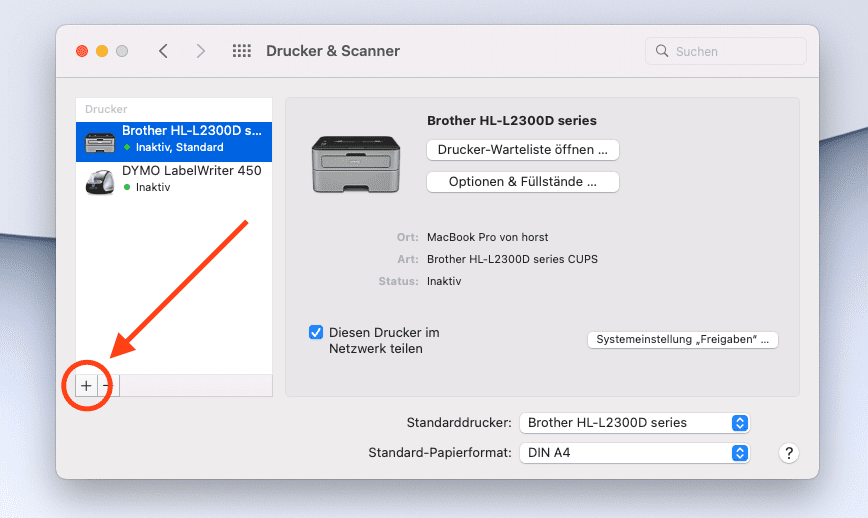
Setting up an AirPrint printer on a Mac is similar to setting up any other printer - however, you don't have to install any drivers, you can carry out the following steps directly under macOS:
- Open the Apple menu in Finder (top left).
- Choose system settings
- Select Printers & Scanners
- Click on the plus symbol in the list on the left
- AirPrint printer should now appear and be selected
Set up an AirPrint printer on the iPad or iPhone
In principle, no setup is required on iOS and iPadOS devices such as the iPhone or iPad. Go to the respective app in which the document to be printed is open, to the share menu or the symbol with the circle and the three dots.

Now a list of options opens, in which you select the item "Print". The following dialog asks for the printer to be used. The AirPrint printer should show up as a printer in this option.
In the following window you can specify page numbers, number of printouts and other settings and start printing.
Related Articles
 New iPads: Apple announces event for May 7, 2024
- iCloud+: features, storage, costs and benefits
- Apple iWork 14.0 – Updates for Pages, Numbers and Keynote
- appleid.apple.com – Application examples for the Apple ID website
- After Apple update: Where are the family emojis?
- These are the most important Apple YouTube channels and their content
- WWDC24 date is set: The Apple conference starts on June 10th!
- Apple manuals and support documents for new and old devices and software


Jens has been running the blog since 2012. He acts as Sir Apfelot for his readers and helps them with technical problems. In his spare time he rides electric unicycles, takes photos (preferably with the iPhone, of course), climbs around in the Hessian mountains or hikes with the family. His articles deal with Apple products, news from the world of drones or solutions to current bugs.