
For blind people and those with severe limitations in visual perception, Apple offers the magnifying glassApp of the iPhone one detection mode on. This uses the device's camera and LiDAR scanner to indicate that there are people or doors in front of you. In addition, detected objects can be displayed as text in "Descriptions" mode and announced as voice output. In addition to announcements about recognized image content and its removal from the iPhone and user, sounds and haptic feedback can also be set. In this guide you will learn how to set it up and what weaknesses the technology has.
Chapter in this post:
Activate iPhone detection mode in the Magnifier app: Here's how!
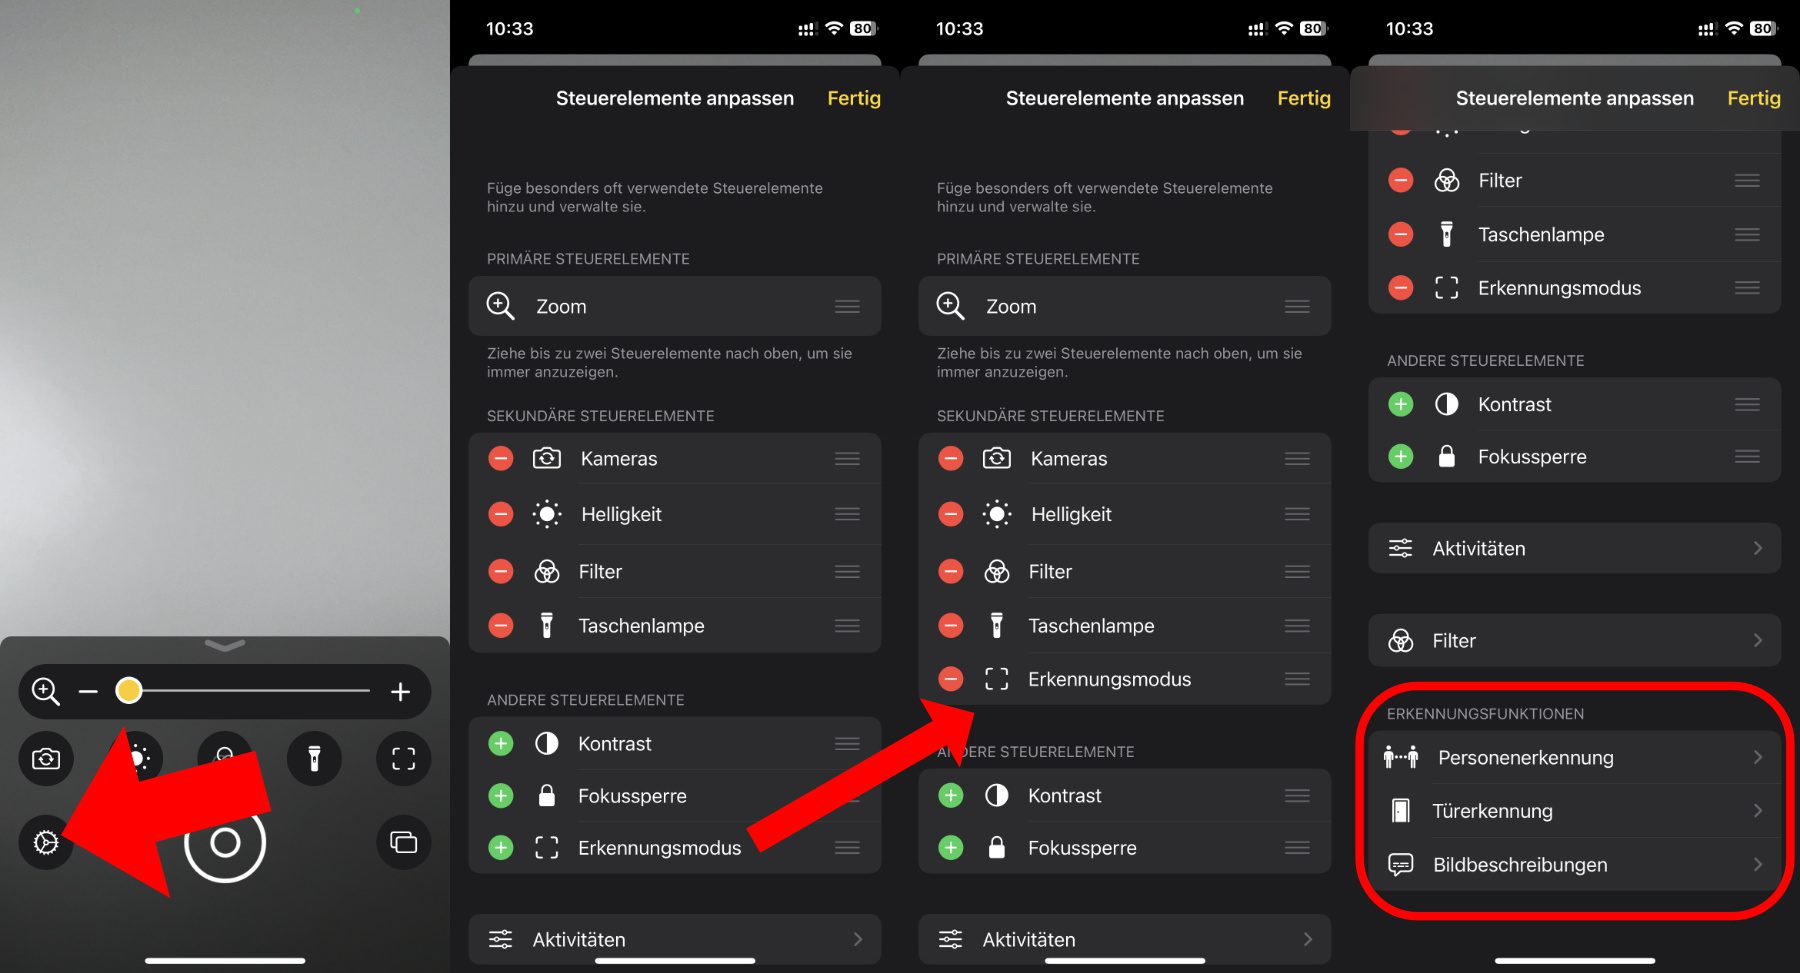
In order to let the iPhone recognize the surroundings and get appropriate outputs for its own interpretation, the recognition mode must first be added to the secondary controls of the Magnifier app. That sounds difficult, but it basically just means adding the environment detection icon to the app's graphical interface. And this is how you do it:
- Opens the magnifying glass app on the Apple iPhone
- type that Gear icon at the bottom left to open the settings
- moves the detection mode from "Other controls" to "Secondary controls" - either via the plus symbol or by moving
- Scroll down for more settings
- Adjusts the settings for under "Recognition functions". people detection, door detection and Image description by tapping on each item and using their menus
The fine tuning for iPhone Magnifier detection mode
As already pointed out, there are three different ways to take advantage of the iPhone camera's recognition function: people recognition, door recognition and image description. I cut the fine adjustments for all three below so that you can get an overview. Of course, the exact settings depend on how you want to use the technology. You may have to try a few things first before you find the ideal combination of the individual options.
people detection
Under magnifying glass, settings, person detection, you can set the distance from which the played sound becomes louder or the haptic feedback reports at a faster frequency. By default, the distance unit is meters, and two meters distance for the start of the higher pitched sounds. But both can be adjusted; the second unit of measure that can be used is feet.
In addition to the tones, which are activated by default, a voice output and the already mentioned haptics can also be activated to indicate the recognition of people. For voice output, the iPhone's ring mode must be activated (slide control on the left side of the device towards the display).

door detection
There are also three output options for door recognition: tones, speech and haptics. Incidentally, these can be combined individually, i.e. all three can be activated at the same time. In addition, it is also possible to set the distance for higher tones, faster haptic feedback or more frequent voice outputs - either in meters or feet. For voice output, the iPhone's ring mode must be active, as is the case for person recognition. However, if you scroll down the Door Detection menu, there are even more settings.

For example, a color can be selected to mark discovered doors on the iPhone display. This is practical in order to achieve the highest possible contrast and to perceive the visual information even with severe visual impairments. Also, double-tapping the back of the iPhone can elicit more details about the doors (option disabled by default). Door attributes and door signs can also be output. Both are enabled by default. For example, the names of shops and restaurants and their opening times can be announced.
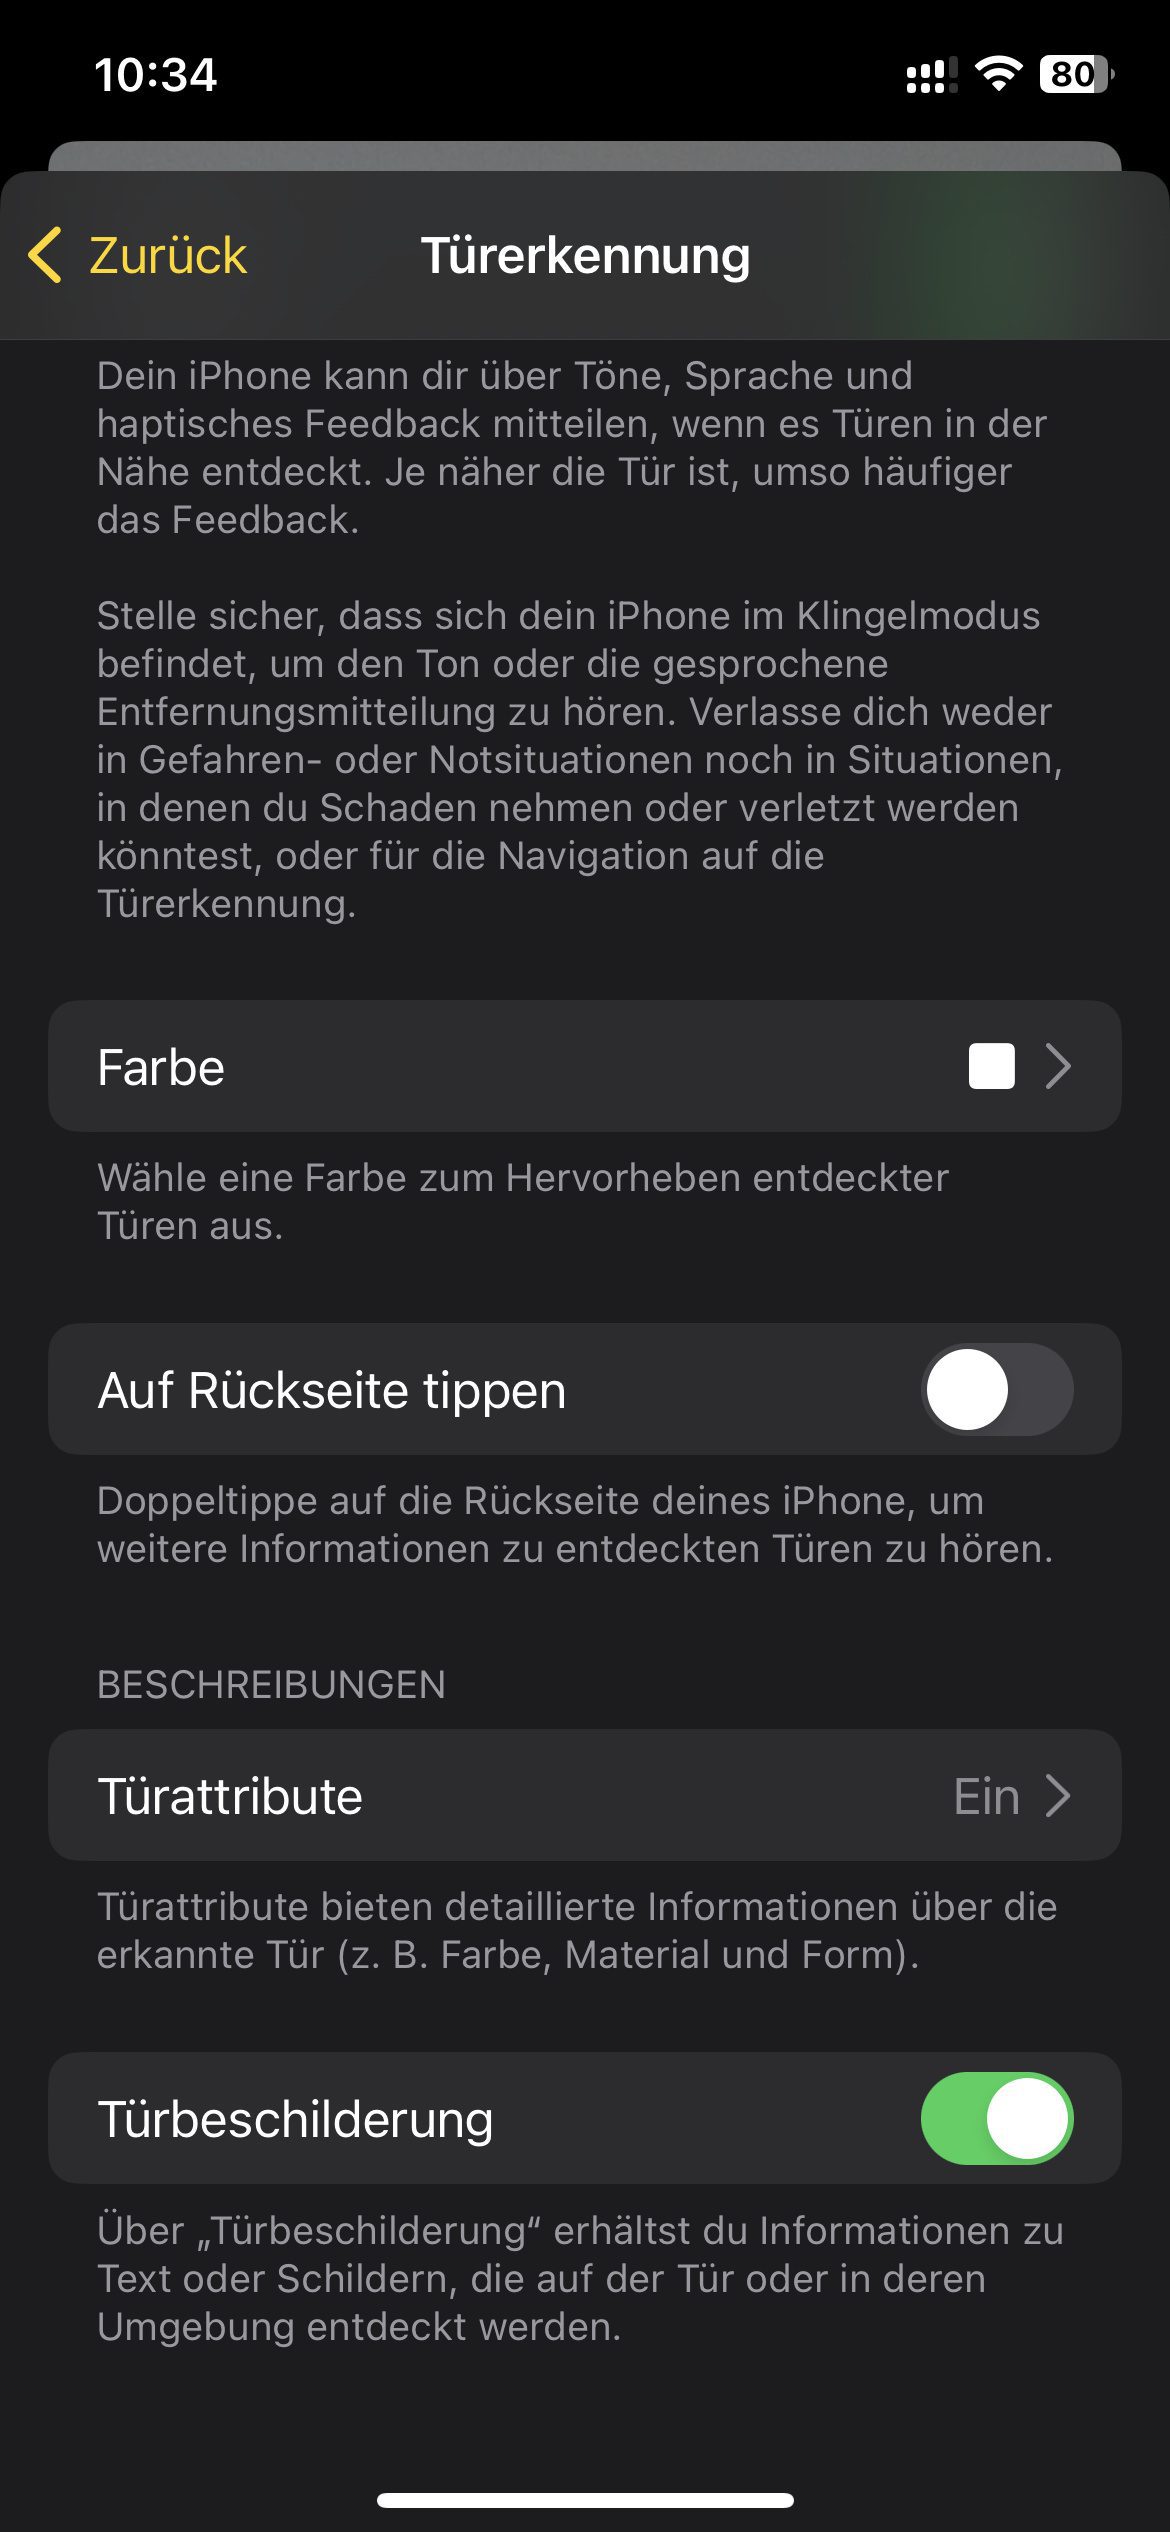
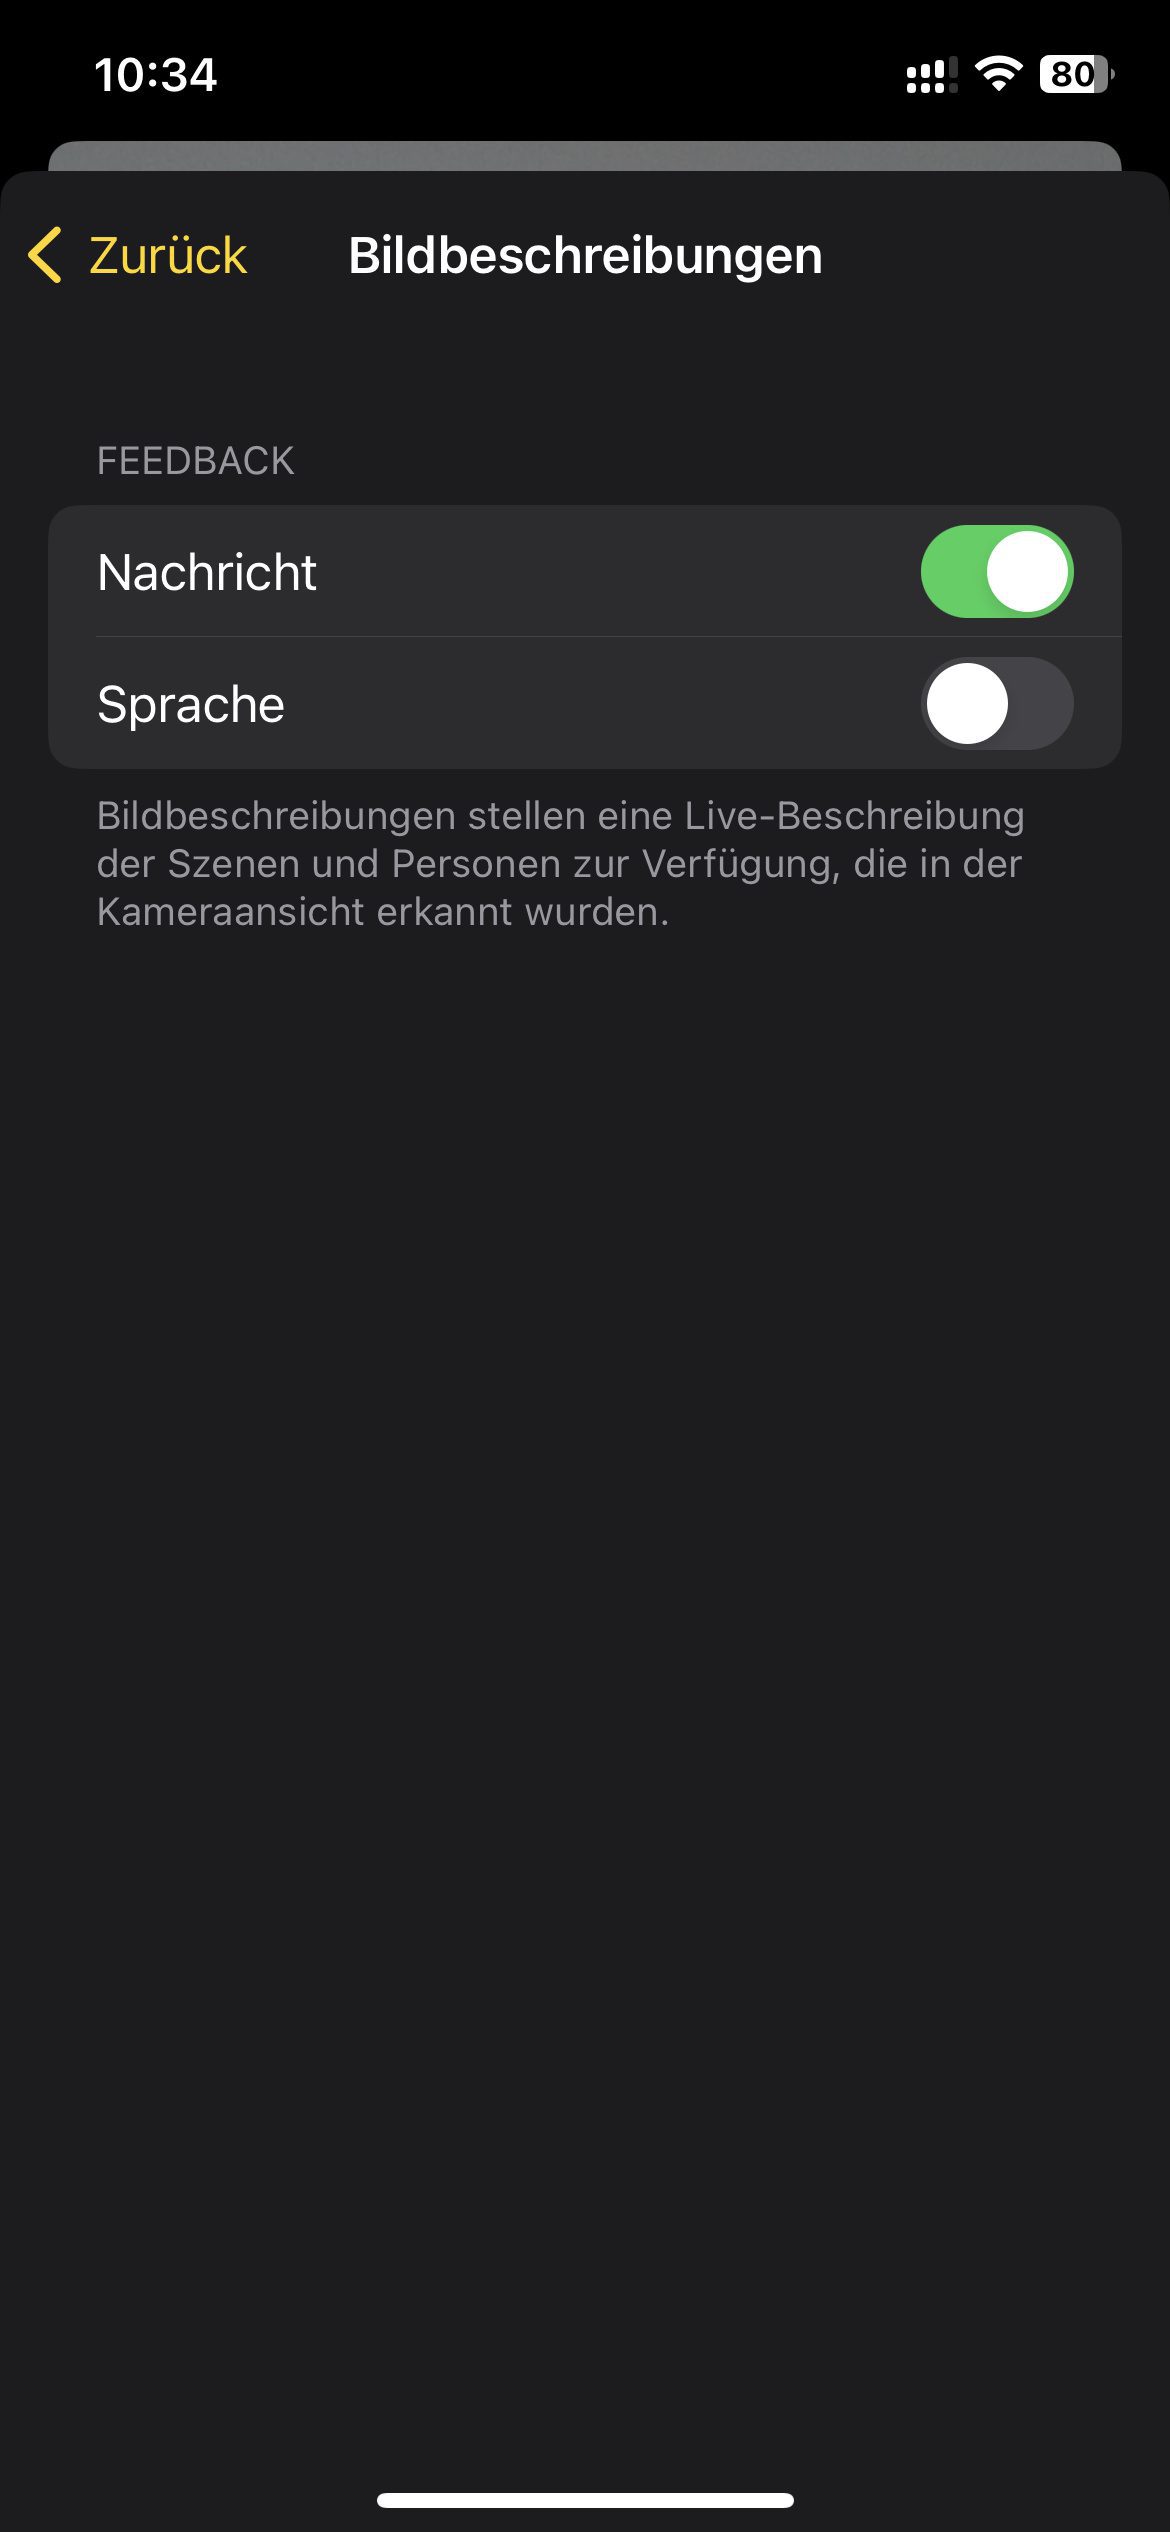
Image description
The image description options in the iPhone Magnifier's recognition mode are less extensive. Here you can only set whether you want text output on the display or voice output via the speakers or headphones - or both.
The detection mode is good but could be better
I briefly used the detection mode for this post on the iPhone 12 Pro iOS 16.1.2 tried. I mainly tested the door recognition and the image description. through the LiDAR scanner the distances displayed and reported by sounds, haptics and announcements were always correct. There is a high probability that you can be sure that you will be guided well through the environment and that you will receive more input for your own orientation. According to Apple however, should not be relied upon in a situation where you could be injured or in an emergency.
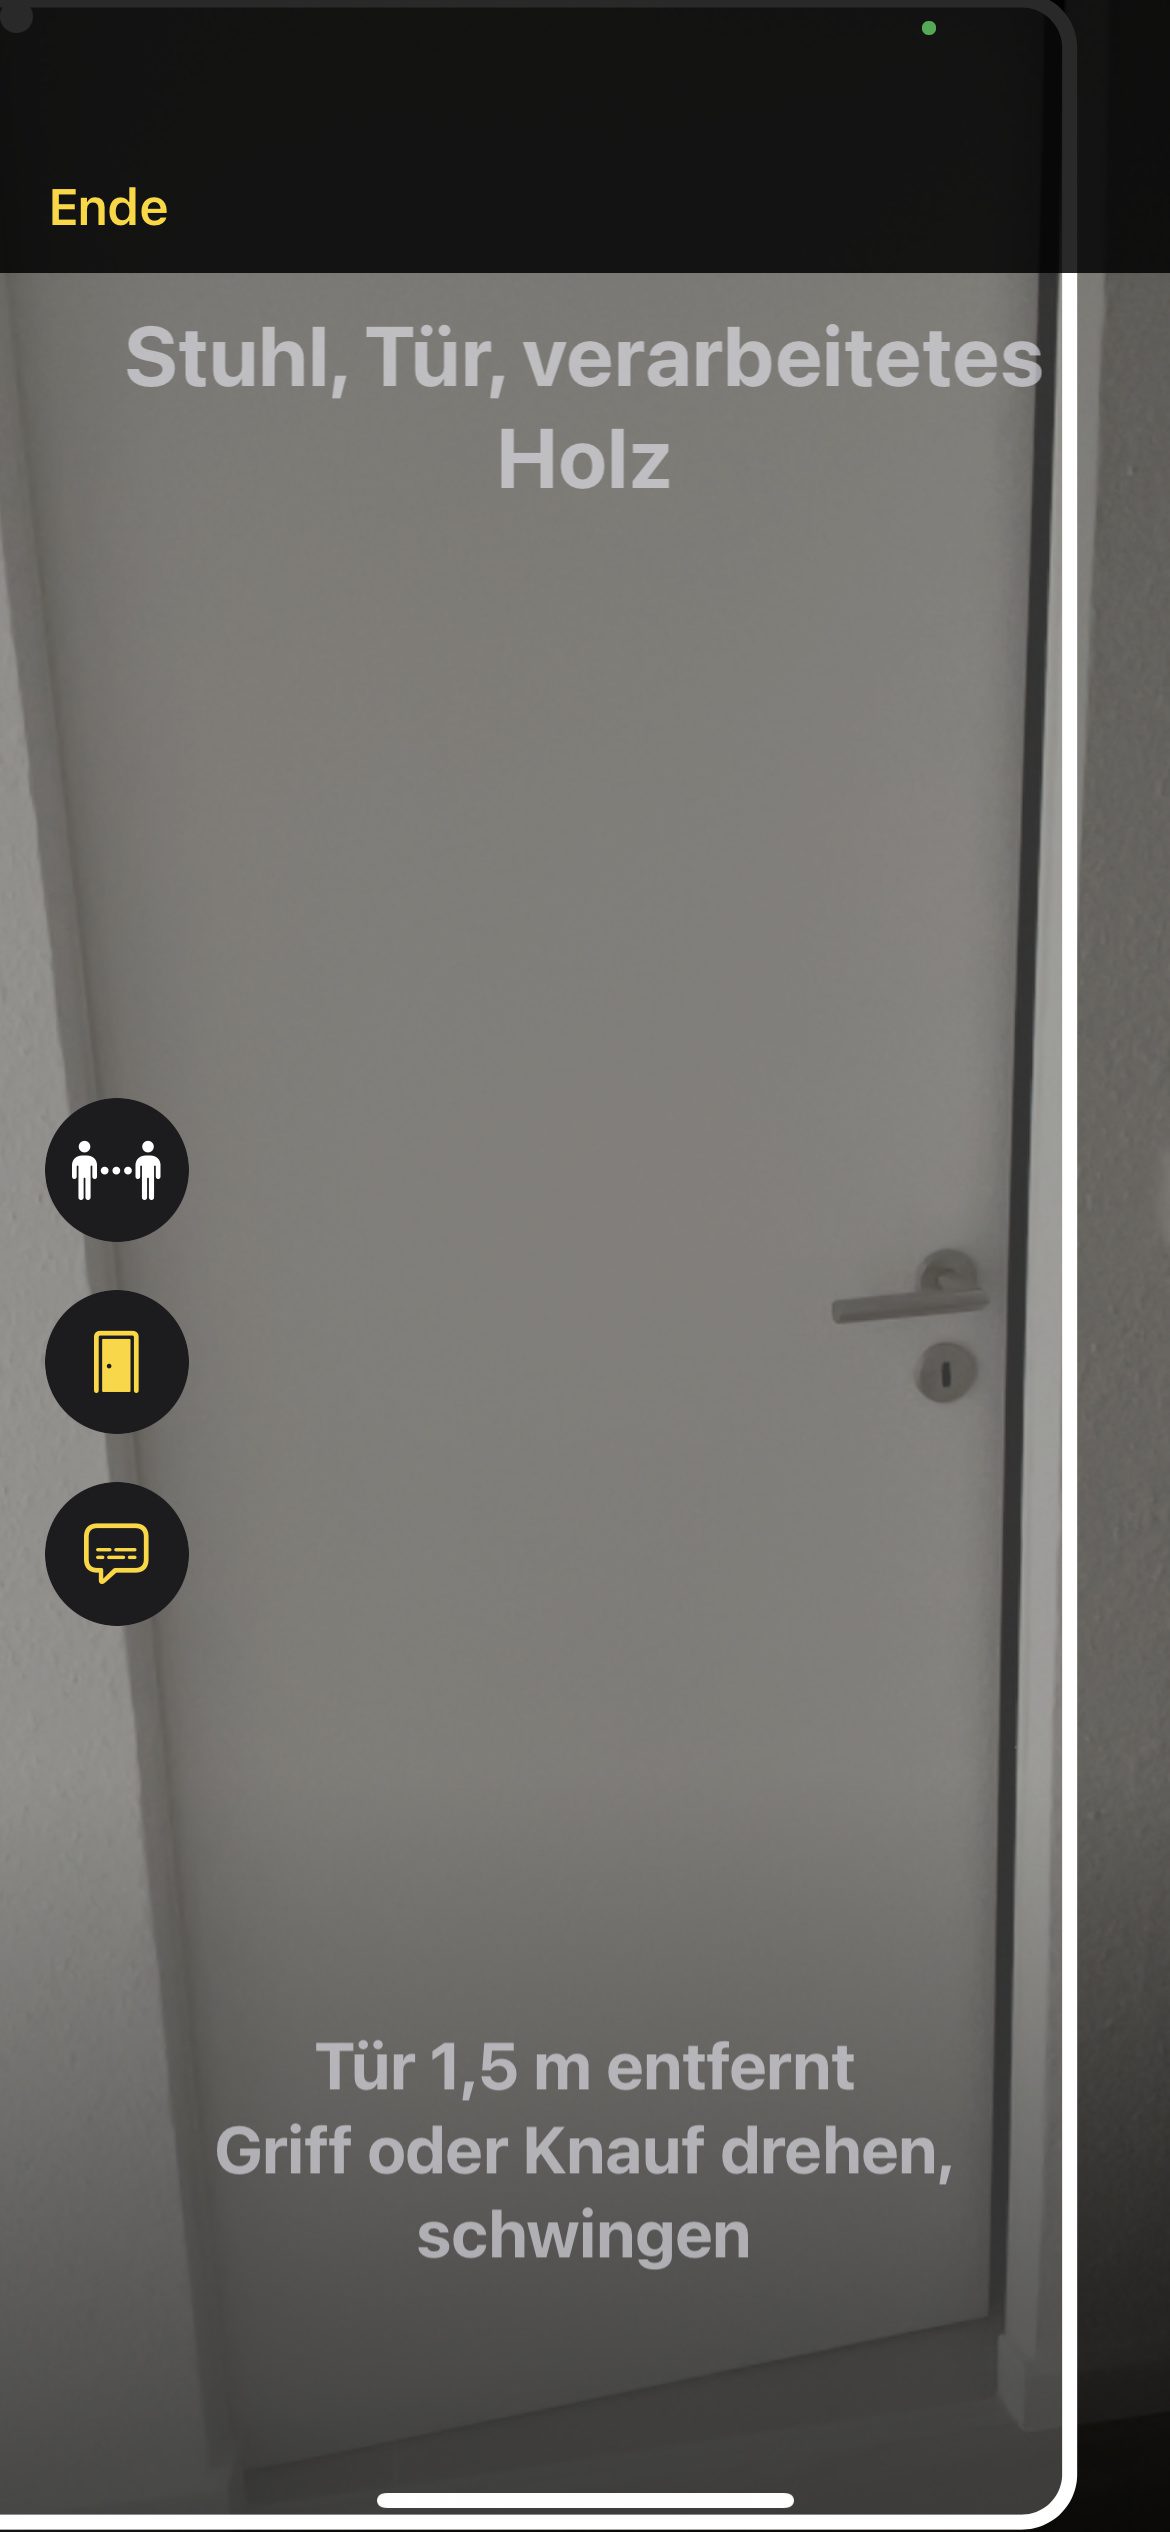
The technology also did well when distinguishing between windows and doors. I have tested this with normal room doors and windows, as well as with a balcony door and windows attached next to it. Nothing got mixed up there. However, when tested several times, the balcony door was sometimes recognized as a simple door, sometimes as an elevator door, sometimes as another door, and various opening instructions were also given. Apple still has to work on the accuracy here.
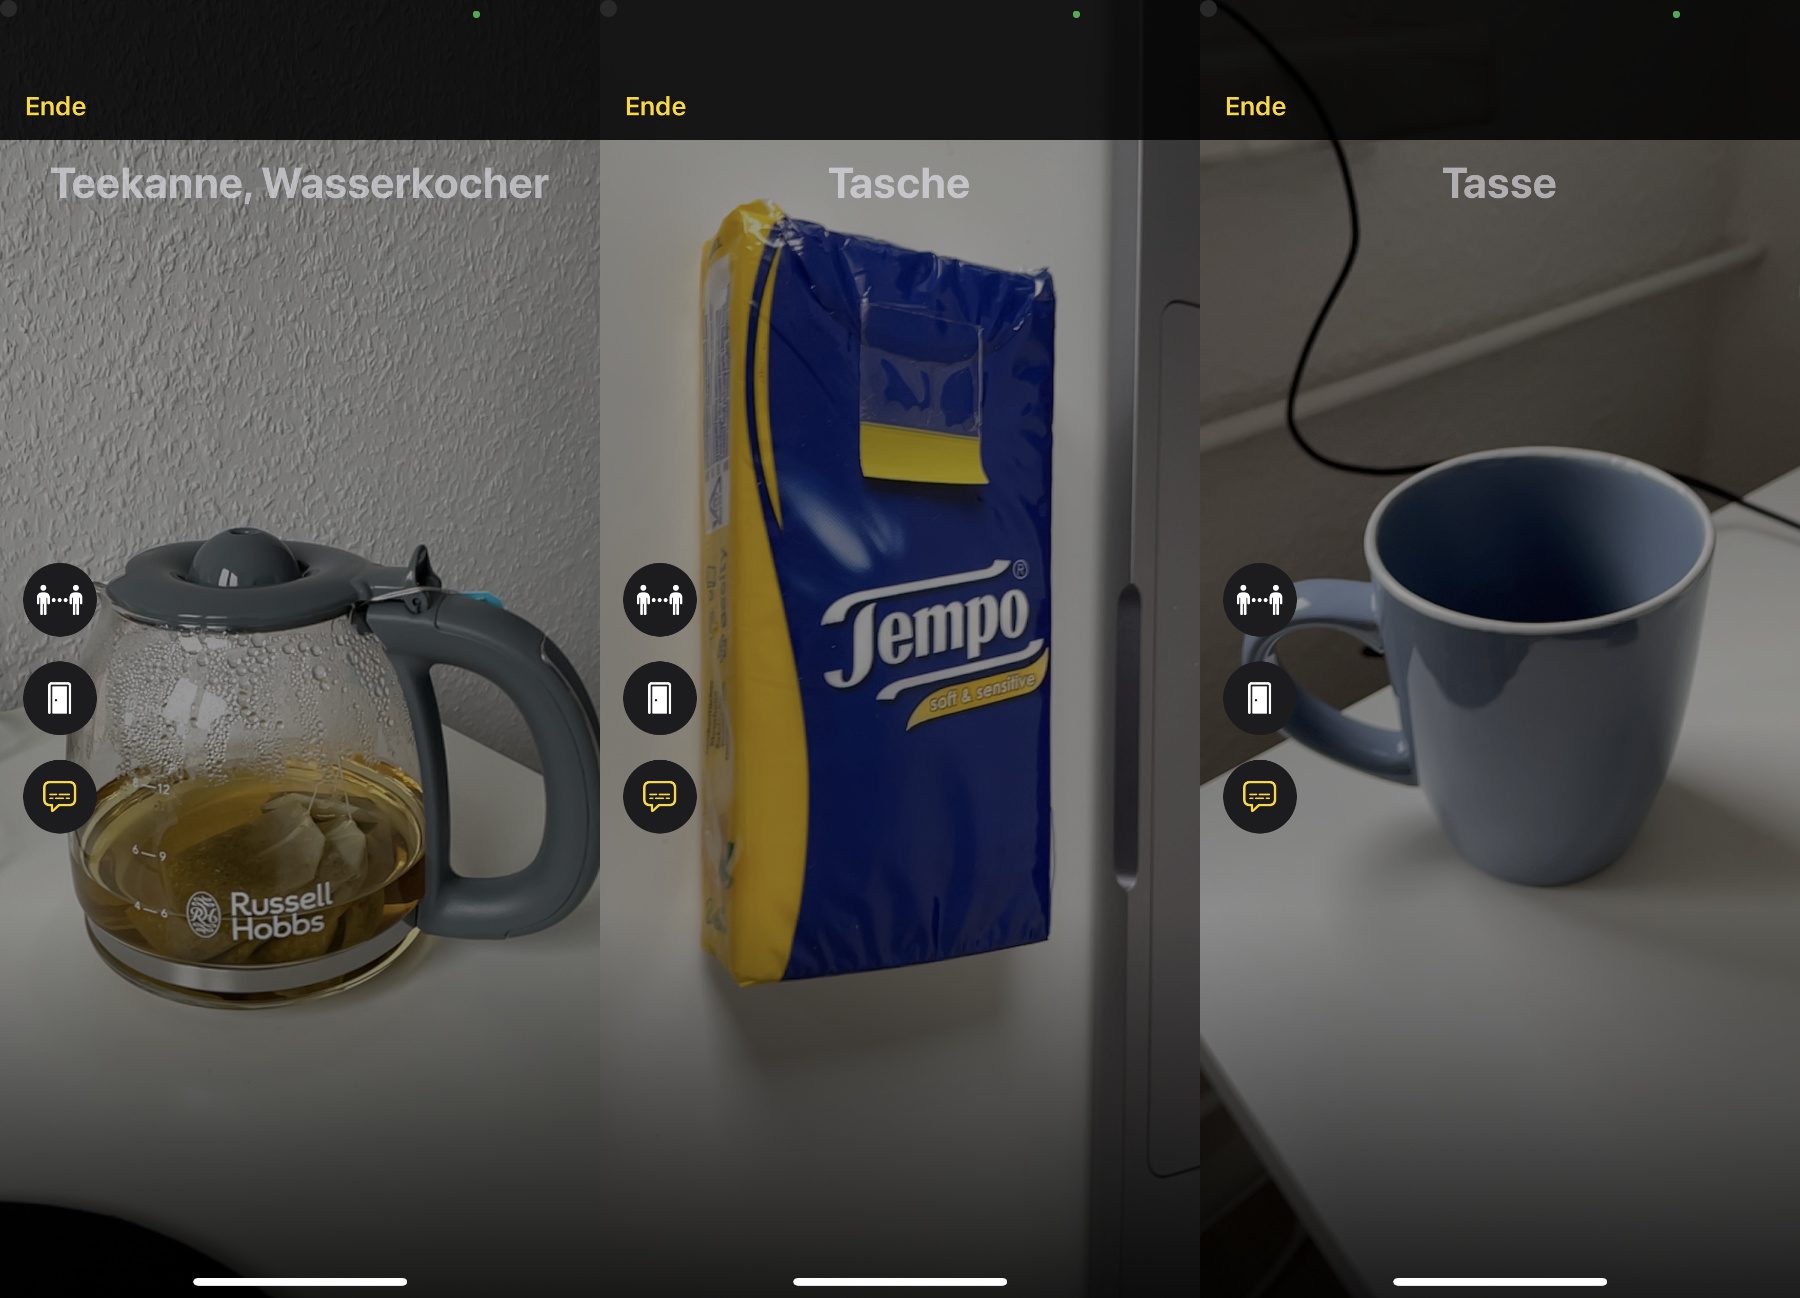
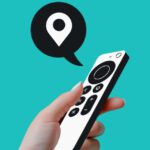
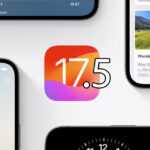
The image description as environment recognition seemed a bit experimental in my short test. A teapot was recognized first as a lightbulb, then as a trophy, then as headphones and finally as a teapot or cookware. To do this, however, I had to remove all other objects from the picture and place the jug in front of a white wall. A pack of tissues was first recognized as a credit card, then as a snack, then as a bag. However: with a laptop, a cup, a window and other rather unambiguous things, there was no guesswork, but the correct result directly.
Related Articles
 SaneBox – Organize, sort and postpone emails with AI (sponsor)
- Solution: “AltStore is no longer available” message on the iPhone
- Cancel AltStore PAL subscription: Here's how!
- Tried it out: Install and use AltStore PAL as an app marketplace on the iPhone
- Surfshark VPN on the Apple TV is now even easier to use (sponsor)
- What's coming to the Apple iPhone with iOS 17.5?
- [Update] AltStore in the test: iPhone sideloading (and game emulation) tried
- 5 app recommendations in April 2024


![[Update] AltStore in the test: iPhone sideloading (and game emulation) tried](https://a391e752.rocketcdn.me/wp-content/uploads/2024/04/iphone-altstore-test-2024-150x150.jpg)

After graduating from high school, Johannes completed an apprenticeship as a business assistant specializing in foreign languages. But then he decided to research and write, which resulted in his independence. For several years he has been working for Sir Apfelot, among others. His articles include product introductions, news, manuals, video games, consoles, and more. He follows Apple keynotes live via stream.