
Do you see insufficient storage space on your Mac's SSD? Or is the available memory getting smaller and smaller, even though you don't put that much new stuff on the hard drive? This may be due to the Time Machine snapshots that are created under the APFS file system. In this guide, you will learn what APFS, snapshots, their storage usage and other manual management of storage space under macOS is all about. It is also about the storage settings apart from the Time Machine snapshots. In any case, you'll get some storage space back - and without an additional tidying up app.

Chapter in this post:
- 1 What does APFS actually mean?
- 2 What are APFS snapshots on Apple Mac?
- 3 View and manage Time Machine snapshots
- Delete 4 APFS snapshots to free up storage
- 5 Enable or disable the creation of Time Machine snapshots
- 6 Memory overview: Details on the memory usage of the hard disk
- 7 Sir Apfelot Forum: Source of Apple-related questions and answers
- 8 My tips & tricks about technology & Apple
- 9 Similar posts
What does APFS actually mean?
The abbreviation APFS stands for "Apple File System" and thus for the file system that has replaced the predecessor HFS+ at Apple since 2017. It was first introduced in 2016 during what was then the World Wide Developers Conference (WWDC). APFS is a 64-bit system designed to work with SSD storage and promises to optimize storage usage. Instead of complete backups, e.g. B. Time Machine snapshots ensure that old file versions can be restored in a space-saving manner. You can read more about APFS here:
- January 2017: Apple File System: APFS file system to replace HFS+ in 2017
- February 2017: APFS: 9 facts you need to know about Apple's new file system
What are APFS snapshots on Apple Mac?
Snapshots consist of information about files that have changed compared to the last memory dump. It is therefore a kind of backup, except that only changes are noted. A complete copy of the contents of the hard disk is not saved, and therefore the memory allocation is not doubled. Local Time Machine snapshots are intended to enable the return to older file versions while saving space. More details here in the post from August 2021: Time Machine snapshots - that's what snapshots on the Mac can do!
View and manage Time Machine snapshots
However, while Time Machine snapshots take up less space than full backups, they still require a certain amount of storage space. If you handle many or large files and amounts of data every day, the snapshots will also stack up accordingly in the virtual height. In order to delete memory images that are no longer required, the path leads you to the Disk Utility.
Apple Mac Disk Utility can be accessed in a number of ways. That's the quickest way to go Spotlight: press command+space, type in "disk utility" (probably it's already suggested to you by "hard drive") and press enter. Alternatively, you can find Disk Utility at Macintosh HD -> Program -> Utilities.
By default, you won't see the APFS snapshots there, but that can be changed quickly. To do this, click in the menu bar presentation and then in this menu Show APFS snapshots. This will add an overview of the snapshots to the Disk Utility window, which you can now manage. Older, large images you can z. B. Delete to free up disk space. By the way, on the left you can select the hard disk / volume on which you want to look for snapshots.
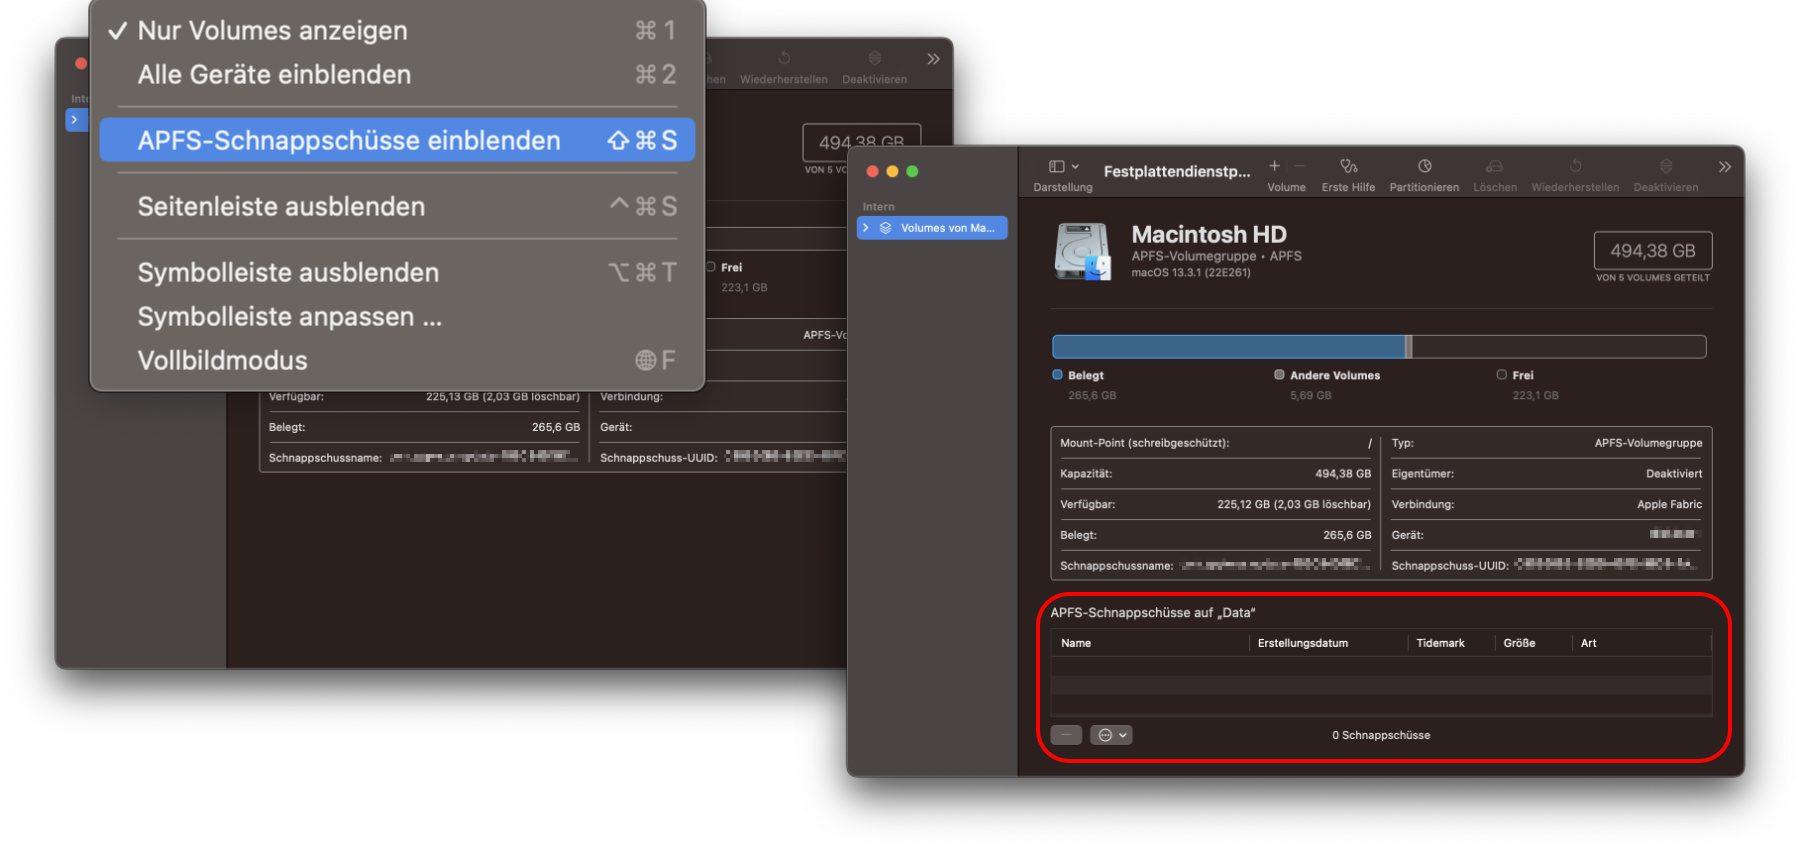
Delete APFS snapshots to free up storage
Update: A reader pointed out that APFS snapshots are only kept for 24 hours and are then automatically deleted. Manual deletion is actually only necessary if you urgently need space and you can create it by deleting the currently available snapshots. /Update end
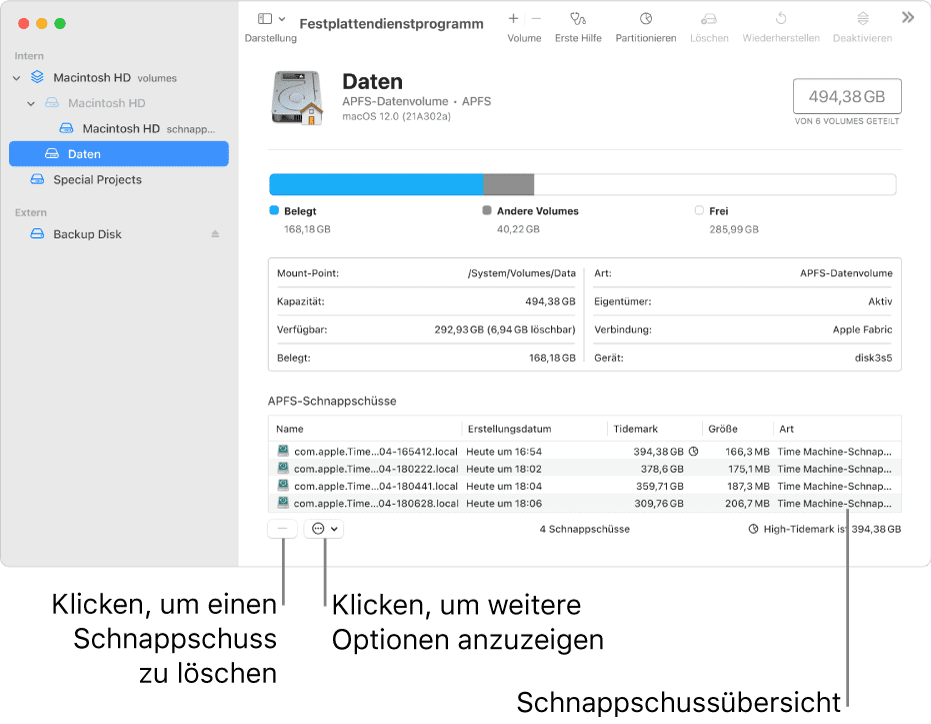
If you want to delete one, several or all of the snapshots displayed, then select them and then click on the minus symbol (–) under the table. Incidentally, in the snapshot table you will find the “Size” column, which tells you how much storage space you free up when you delete the respective snapshot. Since I don't have any snapshots taken myself, it's not so easy to understand with the screenshots shown above. So here is an image from the macOS manual that Apple made available online:
Enable or disable the creation of Time Machine snapshots
I have to admit I've never worked with Time Machine backups, Snapshots or any other automatic backup from Apple. I still manually copy important folders to an external hard drive or to the cloud; and if the rest falls victim to a system failure at some point, then so be it. If you have any questions about Time Machine, you have to contact Jens, browse the macOS manual or look at Apple's support documents. Further information on local snapshots can be found e.g. B. in the document HT204015.
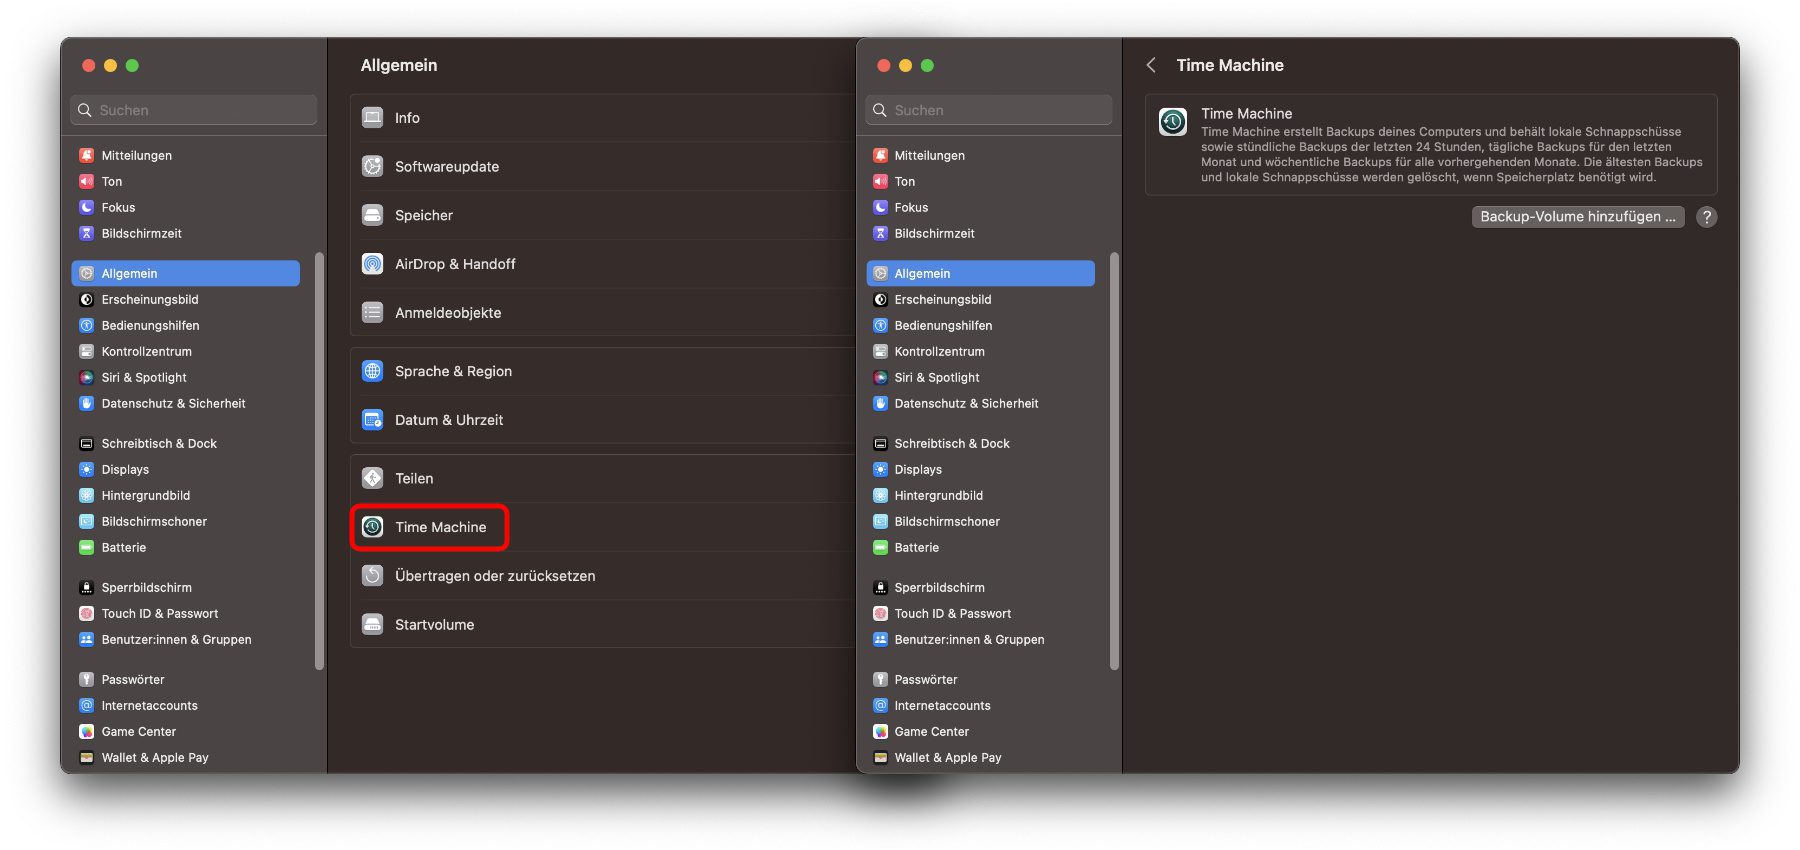
You can find the settings for Time Machine from here macOS is coming under System Settings -> General -> time Machine.
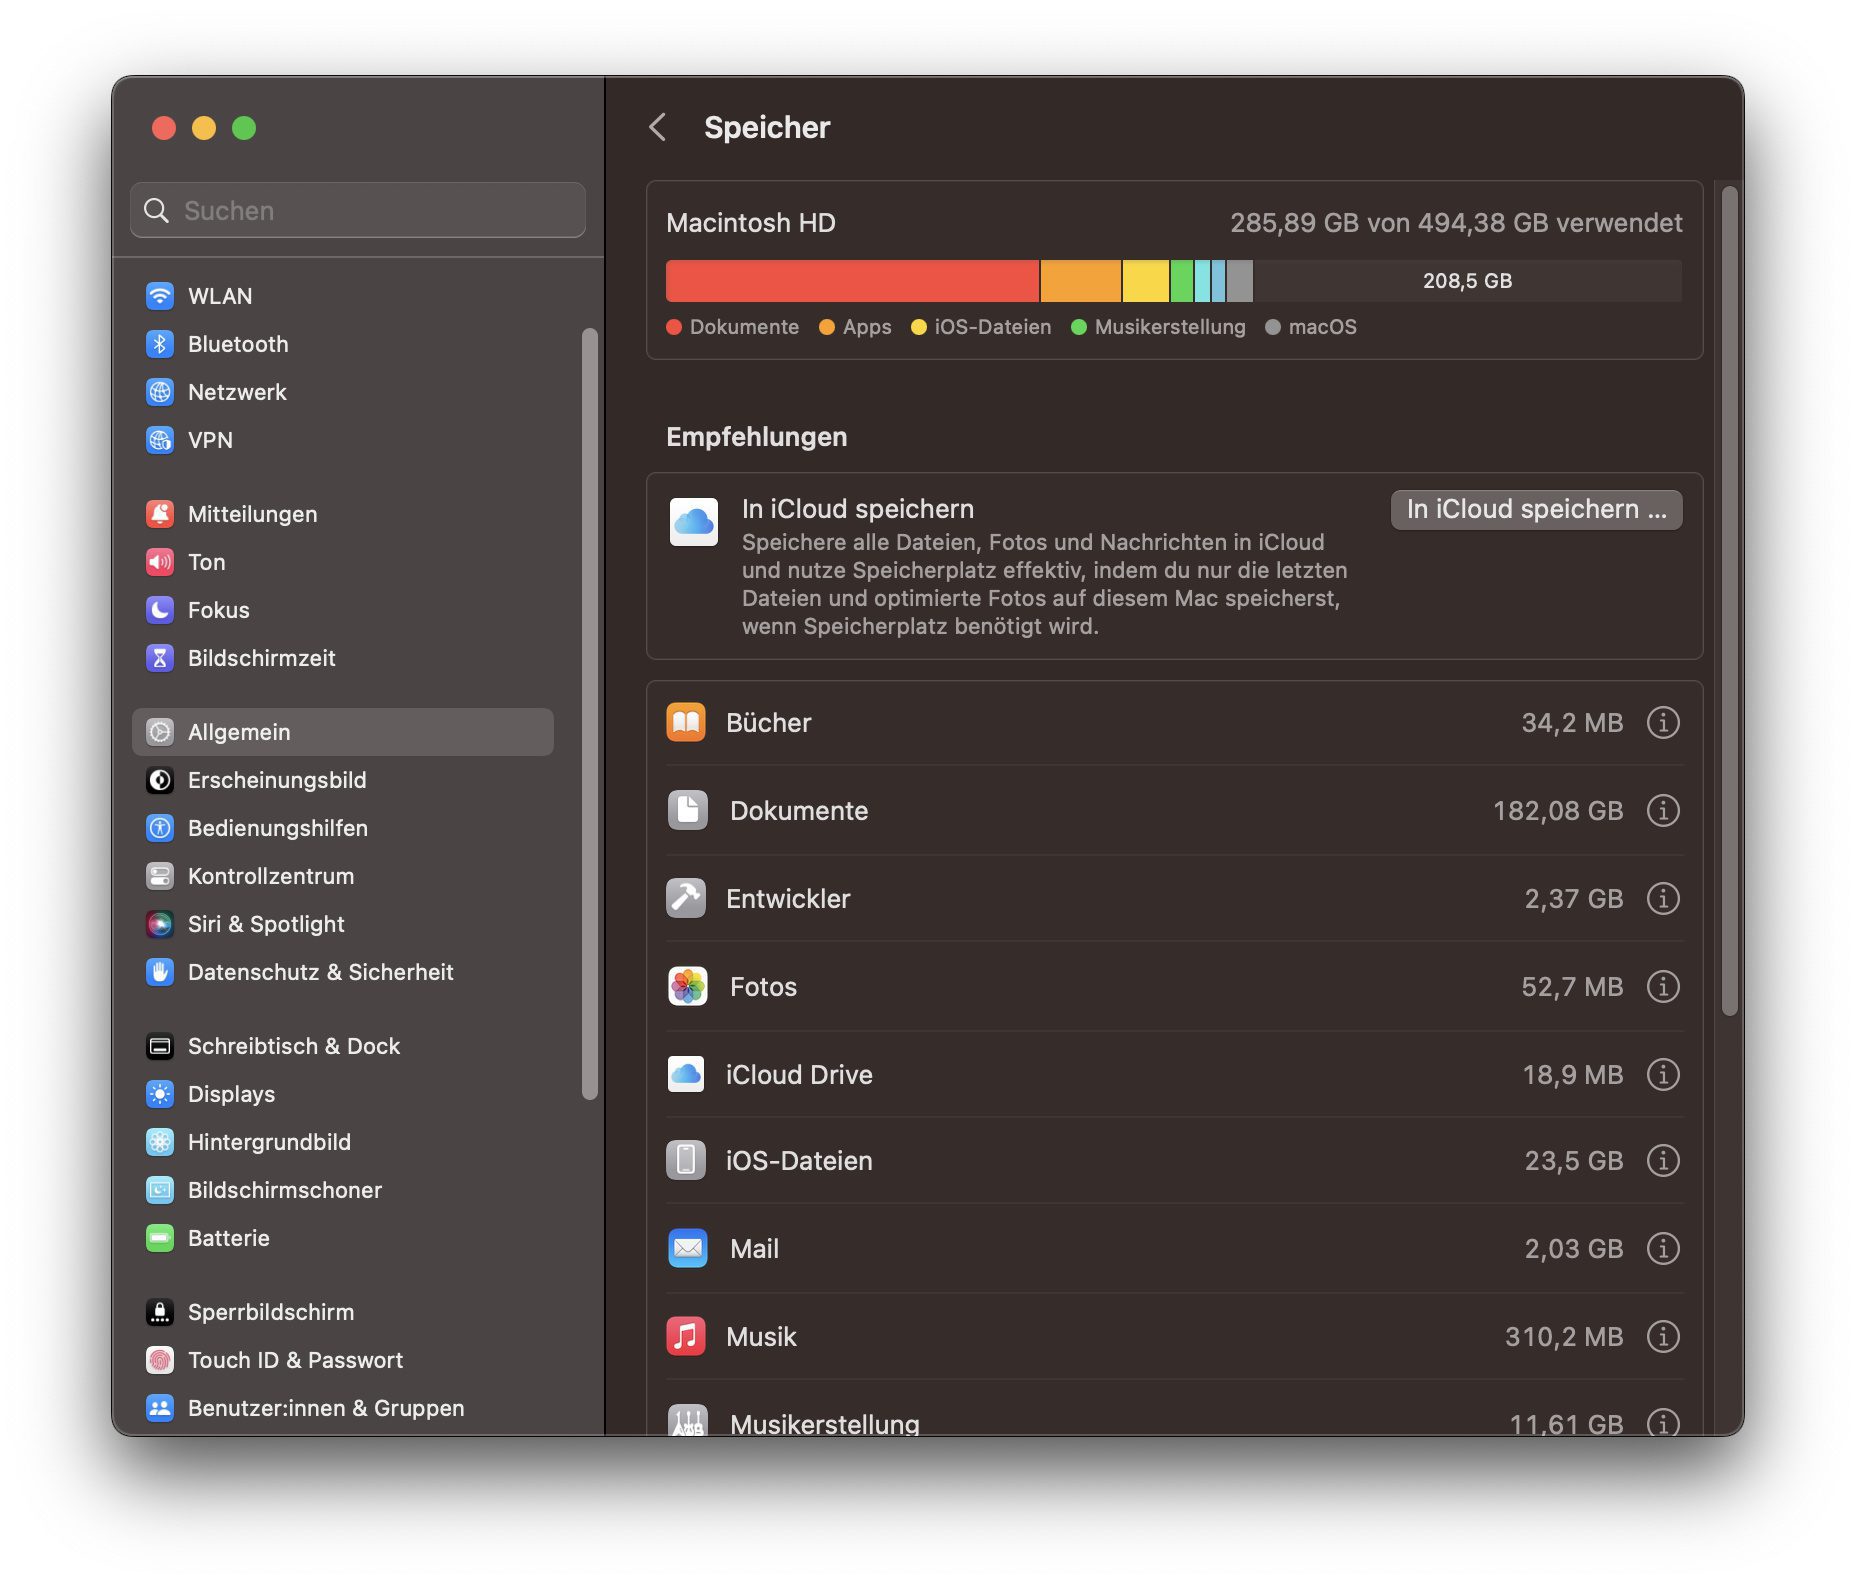
Memory overview: Details on the memory usage of the hard disk
Since I don't use Time Machine backups or snapshots, I don't have any space problems with them. However, my MacBook Pro with 500 GB SSD recently showed me that the memory was full. I had previously transferred a few videos from iPhone to MacBook, but that couldn't fill up the memory yet. So I went on a search.
I was really surprised that the SSD should be full, because I didn't store that many or large files on the device - mainly apps, Pages-Documents and JPEG image files for this blog. After some searching I then found out that a project file of the Final Cut Pro Trial had occupied more than 100 GB. And that for two edited iPhone videos (which themselves took up space) with a bit of color correction.
I found out thanks to the memory overview of macOS. Up to macOS Monterey you call this with -> About this Mac and then on the Disks tab of the window. On macOS Ventura I also have -> About this Mac called up, but then clicked on the "More Info" button. That got me into System Preferences (General -> Info) where I scrolled down and clicked the "Storage Settings..." button under "Storage".
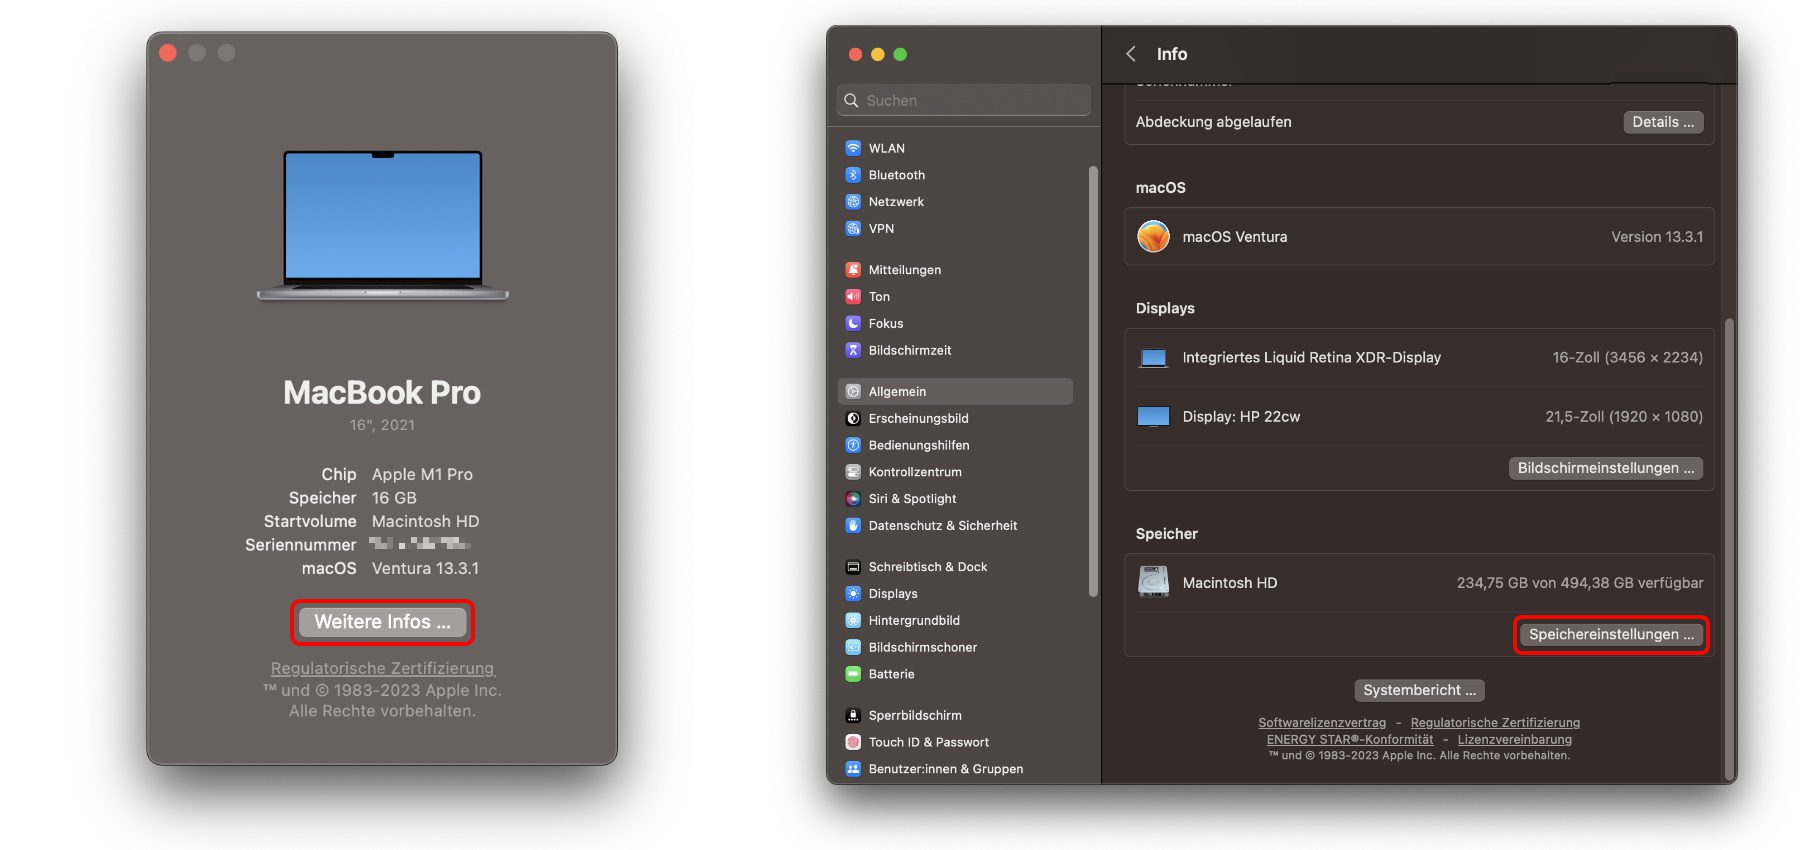
Then, in the same System Preferences window, I was given a fairly accurate breakdown of Macintosh HD memory usage. Not only the colorful bar at the top is informative, but also and above all the information in the table below. If you click on one of the entries (books, documents, photos, iOS files, music creation, programs, etc.), the largest files will be listed individually. That has enabled me under Documents find and delete the video project with nonsensical 100+ GB.
I have now tried to import my video project into iMovie implement. As you can see, this took up quite a bit of memory for me. Once it's all cut and exported, I'll probably delete the project files and raw footage to free up disk space. Now I understand why so many large (external) hard drives are needed in video and film creation :D
Sir Apfelot Forum: Source of Apple-related questions and answers
An entry in the Sir Applerot Forum. Feel free to take a look if you have a question, want to find solutions to other problems, or want to chat about Apple topics in general. There are also areas for other discussions that are only peripherally or unrelated to the iPhone maker.
My tips & tricks about technology & Apple
Related Articles
 What is rapportd and why is this process running on my Mac?
- What is secd and why is this process running on my Mac?
- What is lsd and why is this process running on my Mac?
- Various tricks: Show the menu bar under the MacBook notch
- Quick Look in full screen mode: This is how it works!
- More AI, more sales: The M4 chip is intended to increase Mac sales
- What is corebrightnessd and why is this process running on my Mac?
- Testing a used Mac – list of helpful tips and apps


After graduating from high school, Johannes completed an apprenticeship as a business assistant specializing in foreign languages. But then he decided to research and write, which resulted in his independence. For several years he has been working for Sir Apfelot, among others. His articles include product introductions, news, manuals, video games, consoles, and more. He follows Apple keynotes live via stream.
Incidentally, these local snapshots are also created on the system hard drive if a “normal” Timemachine backup is made on another medium.
In principle, however, these local snapshots are only stored for 24 hours and are automatically deleted, so that you should not run the risk of the system drive “filling up”.
Hello Matthias! You're right. I just looked at it and there are actually no snapshots that are older. But if you work with large files, a lot can of course still come together. But good that they are cleaned up automatically.
Space used by snapshots is considered free by macOS and automatically discards the snapshots when the space is actually needed. Therefore, there is no point in deleting them manually. Time Machine uses local snapshots primarily to ensure the consistency of backups. This means that to create a backup, a snapshot is created and then copied. This means that changes made during the process are not included in the backup. However, if there is space, the snapshots remain there, which has the advantage that you can quickly restore some things if the backup disk is not connected.
Hello Hammer! Thank you for your hint. I did not know that. 😊 I thought the snapshots would just be saved until their time is up. But learned something new again!
There *are* times when the local snapshots take up a lot of system resources; When LLMs are running or live video is being upscaled, `backupd` puts just enough load on the system to reduce the performance of these apps by a third.
“tmutil stopbackup” seems to stop these local snapshots while they are running (macOS 14.2.1, on an M1 MBP)
Thanks for the tip!