
In the development history of Mac, iMac, MacBook, iPhone, iPad and iPod, Apple has installed several types of displays - mostly with the aim of offering clear colors, high resolution and beautiful user interfaces. With the Retina display, however, a problem arose: the burn-in of images, especially if there were bright areas in it. Windows, desk symbols, lettering or other can still be seen for up to five minutes if you switch to a program or picture with a dark color. In the following you will find tips and tricks against shadows, image shadows, afterglow or whatever you like to call it.
Update May 2021: Almost three years have passed since the first version of this guide. A few new tips and information have appeared. In addition, the topic of home office has moved further into the focus of the general public. We have adjusted the post accordingly in order to provide you with the most up-to-date information. Do you have another tip, please leave a comment.
Chapter in this post:
- 1 The reason: IPS technology in MacBook, iMac and Thunderbolt displays
- 2 tips against burning pictures
- 3 Use screen saver and / or hibernation
- 4 Fewer image shadows: desk background, dark icons, night shift
- 5 Briefly switch off the iMac or MacBook and restart
- 6 Use "Dark Mode" under macOS 10.14 Mojave
- 7 Use Dark Mode under macOS 10.15 Catalina
- 8 Use Dark Mode on affected devices under macOS 11 Big Sur
- 9 If nothing helps: use a different monitor
- 10 Second monitor: low-cost offers for home offices and offices
- 11 Your help against burning in pictures
- 12 Similar posts
The reason: IPS technology in MacBook, iMac and Thunderbolt displays
The IPS technology in the retina screens of the individual Apple devices and monitors is to blame for the burn-in of images or the so-called afterglow. IPS stands for In-Plane Switching and not only ensures higher contrasts, but also, thanks to its construction, a "more real picture" and better legibility of text - even when looking from the side. Unlike TFT monitors and screens, which show the wrong colors from a certain angle. According to Apple, the viewing angle for IPS displays is 178 °. Unfortunately, the technology also leads to a residual fragment of light areas if these are displayed for a long time and are then replaced by darker elements.
Apple tried on the one set up for the problem Support page to calm down and show that the ghosting / image shadows are normal:
If an image, e.g. a login window, is displayed on an IPS display for a long period of time, after switching to another image, a faint residual fragment of the image may be momentarily visible. This phenomenon is also known as "burn-in", "image shadowing" or "ghosting". This behavior is normal for IPS displays and the faint residual image will disappear over time.
Tips against burning in images
In the following, I have compiled a few tips and tricks for you to prevent images being burned in on the retina display with IPS technology. Some may not be feasible for you due to your user behavior or the type of application of the iMac, MacBook Pro or Thunderbolt display, others could fit your workflow. Just have a look and feel free to leave a comment if you have any further information on the topic;)
Use screen saver and / or hibernation
If you leave the computer on its own every now and then or if the problem of image shadows only occurs when, for example, you pause a Netflix movie and its writing shows, then a screen saver and hibernation under macOS can help you. Both options ensure that bright areas are not displayed permanently and that no residual fragments can form.
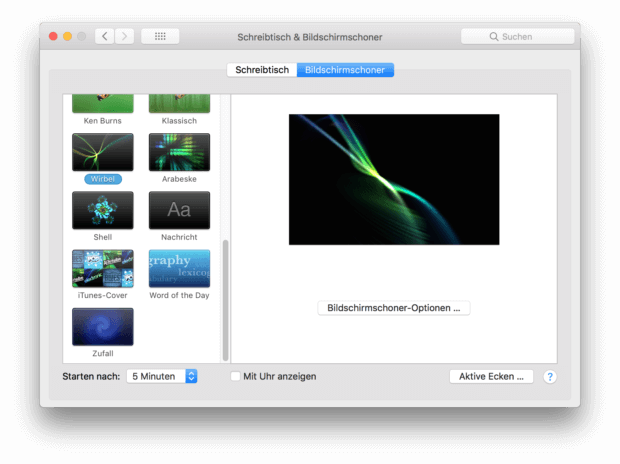
Setting up a screen saver in macOS:
- Select the on the menu bar Apple menu () off
- Then click on System settings ...
- Pick the point Desk & screen saver
- Select the "Screensaver" tab
- Pick a schooner and the time after which it should start
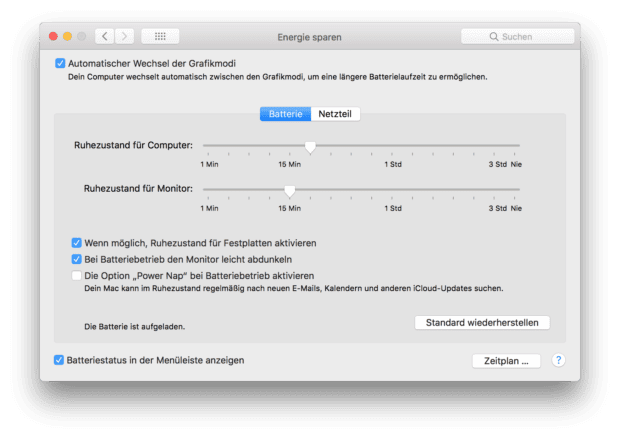
Set hibernation on the Mac:
- Select the in the menu bar Apple menu ()
- Then select the point System settings ...
- Click on the point Save Energy
- Use the sliders to set the time after which the monitor should go into sleep mode
- On the MacBook you can choose between the tabs "Battery" and "Power Supply"
Fewer image shadows: desk background, dark icons, night shift
Depending on which type of use you encounter the problem of image shadows, shadow images or ghost images, a completely white or completely black desktop background image can help. I tend to go for black, as it does not artificially lighten the colors of the program or video or film used afterwards for several minutes.
If you have the problem, as shown in the example image above, that file symbols are burned into the display and you then see them on the surface of the video or image editing program, then you can also make the symbols darker. Changing the icons of folders, drives and files on the Mac is very easy and takes just a few steps:
- Creates a graphic and saves it as an .icns file (e.g. with the Image2icon app)
- Select the file whose icon you want to change and call up its information (cmd + i)
- Drag your picture onto the symbol in the upper left corner of the information window
![]()
If the icon does not change immediately, the computer will restart; so the new icon should be adopted for the file, folder or drive.
From experience, I can also recommend macOS Night Shift mode, which softens the colors a bit and takes place blue light rather conjures up a shade of red, which, by the way, is also better for the eyes. Image shadows are also produced when using Night Shift, but these are not as intense. It is definitely worth a try. You can turn on Night Shift on the top right of the menu bar or you can just tell Siri "Activate Night Shift".

Turn off your iMac or MacBook and restart
If bright areas have burned themselves into your Mac's display again, but you want to get rid of these graphic remnants quickly, then a short break for the computer can help. Depending on the device, its age and its operating system, this can be faster than starting the screen saver and waiting until all of the shadows on the iMac display or MacBook screen have disappeared. So, if possible, just turn off the Apple computer, wait two or three minutes and start it again. Then the burned-in images / image shadows should have largely disappeared.
Use "Dark Mode" under macOS 10.14 Mojave
Not only was it at Apple WWDC 2018 macOS Mojave generally presented, but also with the new possibilities of individual use and setting. The so-called dark mode is also among the new options for the Mac operating system. The dark mode ensures less bright areas that cannot be burned into the display. White lettering, symbols or the blank image from your image editing software can still be burned in.
Use Dark Mode under macOS 10.15 Catalina
Also in the Mac operating system macOS 10.15 Catalina from 2019 there is the dark mode, which ensures less dark areas, buttons and the like in the system and in app windows. In this way, no large areas of the screen are burned in and are annoying if you want to reproduce darker content immediately afterwards. The good thing is that many app developers now also design their apps so that they can be used in both light and dark mode. In this way, you actively prevent buttons, areas, menus and more from being burned in if you use your app for a long period of time.
Use Dark Mode on affected devices under macOS 11 Big Sur
The problem should no longer occur on more modern iMac and MacBook models. But if you still use a device that is "between the chairs", that is, uses older technology, but is already compatible with macOS 11 Big Sur, then you should activate the dark mode here as well. You can find out which Mac models from Apple are compatible with the 2020 operating system in this guide: macOS Big Sur - These Mac models are compatible (detailed list). Some of the computers came out in 2013 or 2014.
If nothing helps: use a different monitor
With an iMac in particular, you might think twice about whether you should really move your work to a new monitor because of image shadows. After all, this also costs money and takes up additional space. However, if the problem occurs too often for you and none of the tips above help, then another / additional screen might be right for you. A Thunderbolt display can certainly be replaced earlier - and an additional monitor on the MacBook (Pro) is always good;)
Second monitor: Favorable offers for home and office use
If you want to use a second monitor on the iMac to move light content such as word processing documents, the web browser or the like onto it, then you can currently benefit from the cheapest offers. Two external monitors can also help on the MacBook. If you want to use a maximum of two screens, you can leave the MacBook closed and only work on the two additionally connected graphics output devices. You can find a guide on the topic of recommended monitor models with this link: Good and cheap (second) monitors for the home office.
Your help against burning in pictures
Do you have any other tips and tricks against burning in images on retina displays with IPS technology? Maybe we missed something or haven't even mentioned one of the best tips in this article. Feel free to leave a comment with your solution or your workaround! Conversations about Apple hardware and working with it can also be found in Sir Applerot Forum. There you can also discuss individual blog articles, but also discuss topics apart from them. Just take a look :)
Related Articles
 Clean AirPods Case - my hardcore test
- Malware lexicon: what is malware and what types are there?
- What is a backdoor?
- Sugru - the practical adhesive putty from Tesa
- Instructions: Download video from Reddit – 3 options explained
- Use Apple AirTag for NFC actions on the iPhone: Here's how!
- Create a QR code to share the WiFi access data - but securely!
- Connect old Firewire hard drive to modern USB-C Mac


After graduating from high school, Johannes completed an apprenticeship as a business assistant specializing in foreign languages. But then he decided to research and write, which resulted in his independence. For several years he has been working for Sir Apfelot, among others. His articles include product introductions, news, manuals, video games, consoles, and more. He follows Apple keynotes live via stream.