
Within the WWDC22 keynote in June 2022 was released for iOS 16 and macOS 13 Adventure announced that image content (people, animals, objects, etc.) can easily be cut out with on-board tools. This means that you can select the corresponding image content and use it individually - the background becomes transparent. Jens has shown here how this works and the limitations that have existed under iOS 16 so far: Automatically crop photos with iPhone. In the following I will show you how you can crop image content on the Apple Mac from macOS Ventura.
Chapter in this post:
Crop photo and image content from macOS 13 Ventura
In order to crop the content of a photo, screenshot or other graphic, the corresponding file must be opened in the Preview app. By default, this works for JPG, PNG, and other graphic files by double-clicking them. However, if another program is selected as the default for viewing images and photos, then right-click on the selected file and then select Open with -> Preview.
If the image has been opened with a preview, then you have two options for placing the object in focus, the depicted person, group, animal or similar, in front of a transparent background. The first option takes you via the menu bar at the top of the screen. That's how it works:
- Open the image with the Preview app
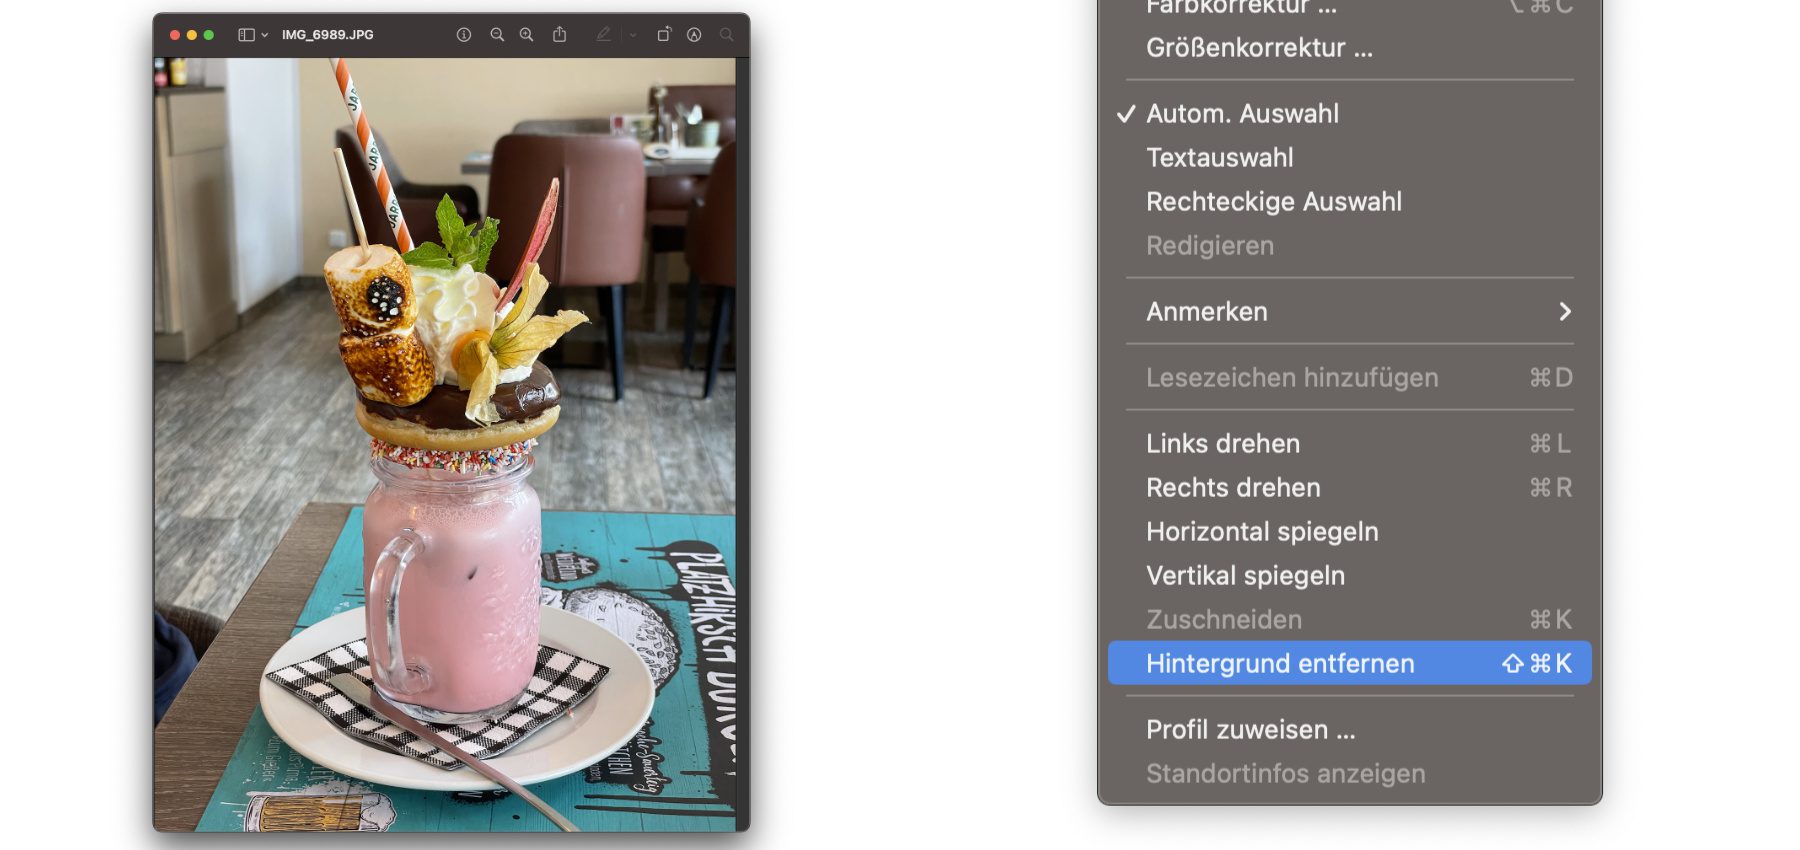
- Click in the menu bar Tools
- Choose from the Tools menu Remove background from
- If the source graphic is not a PNG file, you will be asked if you want to save the cropped content as a converted PNG
- After saving, you can continue to use the content without a background
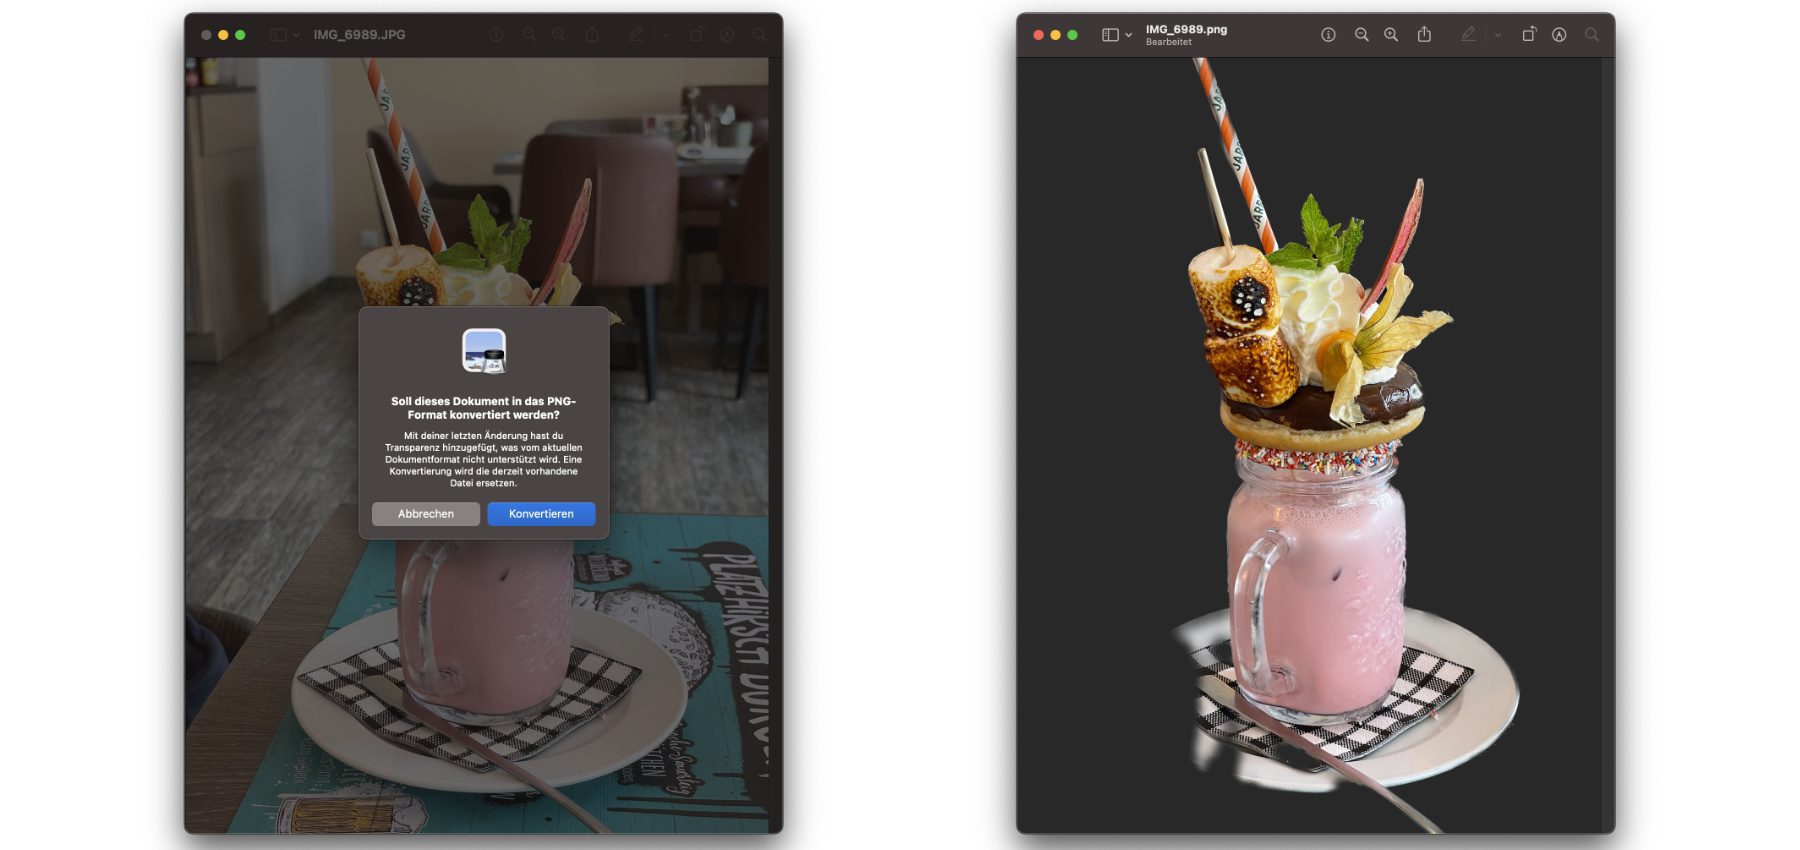
As you can see in the pictures, the feature works quite well. However, it is not free of errors. There are blurred edges and a transparency flowing into the elements on both the wooden skewer of marshmallows and the straw. The plate is completely beyond good and evil, although there is sufficient contrast between the plate and the base or tabletop.
Crop photo content on Apple Mac with keyboard shortcut
The second way to crop image content and the focus motifs of photos on the Mac from macOS 13 is to use the key combination command + shift + K Shift and K. The symbols are as follows: ⌘⇧K
If you apply the shortcut to an image that is not saved as PNG, you will also be asked if you want to convert it to this format. Only when the new image has been stored in this way without a background can you process it further. Please note that this will replace the original file. So if you want to keep them, use a copy to cut out the background.
Tips for better results when cropping
If you crop image content with macOS Ventura, you can use a few tricks to significantly improve the quality of your results. Here are some tips to help you get the most out of this feature:
1. Selects high contrast images: Images where the object you want to crop has a high contrast to the background work best. A clear difference in color or brightness between the object and the background makes it easier for the software to distinguish the two.
2. Pay attention to the lighting: Good lighting can make a big difference. Areas in the image that are too dark or overexposed can affect the accuracy of the crop. Tries to use images with even and natural lighting.
3. Uses the correct resolution: While higher resolution is not always necessary, an image with good resolution can help preserve finer details when cropping. However, avoid extremely high resolutions as these can unnecessarily increase processing time.
4. Use the preview for post-processing: After you have cropped an object, you can use the preview app to correct any imperfections. Use the drawing and selection tools to retouch the image or manually remove excess areas.
5. Make a copy before editing: Before you start cropping, you should make a copy of your original image. This way you always keep an unchanged version if you are not satisfied with the result or want to start again.
6. Experiment with different images: Not every image is captured perfectly. Experiment with different types of images to get a feel for what types of subjects and backgrounds work best.
7. Use additional image editing software: If you're looking for even more professional results or want to make specific adjustments that go beyond the Preview app's capabilities, you can import the cropped image into image editing software like Adobe Photoshop for further editing.
By applying these tips, you can significantly improve the quality and precision of your cropped images on macOS Ventura. Experiment a little and find out which techniques work best for your specific projects.
Creative uses for cropped images
Cropped images offer a wealth of creative possibilities, both for personal projects and professional applications. With macOS Ventura you can take full advantage of this flexibility. Here are some inspiring ideas on how you can use cropped images creatively:
1. Personalized Greeting Cards and Invitations: Use cropped photos of yourself, your family or friends to create individual greeting cards or invitations. The ability to place the motif without a distracting background gives your cards a professional look.
2. Impressive Presentations: Whether for school, study or work – you can enhance your presentations with cropped images. They help focus on what’s important and make your slides more visually appealing.
3. Creative Web Design: Web designers can use cropped images to create dynamic and attractive websites. They offer a wide variety of design options, especially when creating banners, backgrounds or interactive elements.
4. Social Media Posts: Use cropped images to make your social media posts stand out. Whether for Instagram, Facebook or Twitter – an image without a background can draw your followers’ attention directly to what’s important.
5. Art Projects: For artists and creative people, cropped images open up new horizons in digital art. They allow different elements to be combined in one work of art without having to respect the boundaries of the original background.
6. Product presentations: Online retailers and marketers can use cropped images of their products to present them in catalogs, websites or promotional materials without a distracting background. This increases product focus and can improve sales opportunities.
7. Educational materials: Teachers and lecturers can use cropped images to make teaching materials and handouts more descriptive. They are ideal for visually supporting complex content and promoting learning.
The use of cropped images is only limited by your creativity. Experiment with different applications and discover the diverse possibilities that arise from the simple and effective cropping function on macOS Ventura.
FAQ: Cropping image content under macOS Ventura
Can we crop any image format on macOS Ventura?
Yes, you can release most common image formats such as JPG, PNG and others. However, the cropped image is saved as a PNG to enable transparency.
Does the cropping function also work with complex backgrounds?
The feature works best with images that have clear contrasts between the focus object and the background. Complex backgrounds could result in impurities. We recommend using images with as simple a background as possible for best results.
Can we restore the original background after cropping?
No, once the background is removed, it cannot be restored automatically. It is advisable to keep a copy of the original image before cropping.
What to do if the result of the exemption is not satisfactory?
You can further edit the image in an image editing program to manually correct any imperfections or improve the cropping. macOS Ventura also offers basic editing tools in the Preview app for minor adjustments.
Can we crop multiple objects in one image at the same time?
The cropping function usually focuses on one main object. To crop multiple objects, you may have to do the process for each object separately or use a specialized image editing program.
Is there a keyboard shortcut for the crop function?
Yes, the keyboard shortcut ⌘ + Shift + K (cmd + Shift + K) allows you to quickly crop an image after opening it in the Preview app.
Can the extracted images be used in all applications?
Yes, the cropped images saved as PNG can be used in most applications that support transparency. These include image editing programs, presentation software and web design tools.
Do we need an internet connection to crop images?
No, the crop feature is part of the Preview app on macOS Ventura and does not require an internet connection.
Related Articles
 What is lsd and why is this process running on my Mac?
- Various tricks: Show the menu bar under the MacBook notch
- Quick Look in full screen mode: This is how it works!
- More AI, more sales: The M4 chip is intended to increase Mac sales
- What is corebrightnessd and why is this process running on my Mac?
- Testing a used Mac – list of helpful tips and apps
- Share the screen in FaceTime: Instructions for iPhone, iPad and Mac!
- What is suggestive and why is this process running on my Mac?


After graduating from high school, Johannes completed an apprenticeship as a business assistant specializing in foreign languages. But then he decided to research and write, which resulted in his independence. For several years he has been working for Sir Apfelot, among others. His articles include product introductions, news, manuals, video games, consoles, and more. He follows Apple keynotes live via stream.